canopus

Canopus - Computer Connections

Capturing with the Canopus capture box is the alternative to using the BlackMagic box; this is used when the customer requests an AVI container whereby we do not need to capture with FFV1 or FFV1.3 and then convert to AVI. When dealing with VHS or SVHS there are two ways to connect to the Canopus. VHS Connection:

With the VHS deck, where there is no S-video out, the video out is simply connected to the Video In on the front of the Canopus, as are the Left and Right of the Audio. The Canopus is then connected to the computer via Firewire, thereby including both video and audio.

S-VHS Connection:

The S-VHS deck has S-Video OUT. An S-Video cable thereby is connected to the S-Video IN on the front of the Canopus. Again, the Canopus is then connected to the computer via Firewire (video and audio included).

This post will continue...

Issue with the Canopus on Capture 2

If Vegas does not recognize the  Canopus device - try powering everything down. Then disconnect the  Canopus firewire as this is powering the  Canopus, it will then re-set the  Canopus when powering back up. This has seemed to solve this issue.

External Monitor In Vegas

Overview Why use an external monitor in Vegas?  An external broadcast monitor will provide an image of what the customer is going to see....especially the colours.  The LCD monitors are not great with colour correction.

Set Up

  1. Connect the Canopus ADVC 100 (or 300) via firewire to the editing system (Flag or Apollo).  Theoretically we should be able to connect two PC systems  as the Canopus has two firewire connections.  The Canopus has a built in priority system and will select which input to use if multiple inputs are available.
  2. Take a S-Video to S-Video cable and plug one end into the Canopus video OUTPUT.
  3. The other end of the S-Video cable plugs into the back of the monitor.
  4. Switch on the monitor and let it warm up for a couple of minutes.
  5. Turn on the Canopus.   Make sure it is switched to Digital input (hold done the top button to switch).
  6. You can hold the Canopus input selector down for 3 seconds and it will display color bars.
  7. If the monitor needs color bars....check out the article on it.
  8. In Vegas......set options/preferences/preview device to OHCI Compliant IEEE 1394 DV
  9. Click the "external preview monitor" button in the preview window to send the signal to the external monitor.

Transferring a Copy Protected VHS Tape

Overview: The odd VHS tape will have copy protection.  The copy protection will probably be Macrovision.  And here is a simple way to get around it.

Tools:

Canopus ADVC100

Summary:

Use the Canopus ADVC100 to strip the copy protection.  Place the unit with the 3 cables coming from the VCR into the Canopus and either the firewire out to the computer or the 3 cables out to the DVD recorder.

Details:

(From: http://www.guygraphics.com/REVIEWS-192003.html )

(also similar but for ADVC 100:   http://forum.videohelp.com/threads/233261-Canopus-ADVC-100-vs-Canopus-ADVC-110 )

Macrovision Protection/Elimination Controversy As many people in the video editing world are aware, Canopus has been around in the mainstream for a long time. One of their earlier products was an analog to digital converter called the ADVC-100. And often, when people talk about the Canopus ADVC-110, then often refer to it as “the ADVC-100 without macrovision elimination”. This is mainly because the ADVC-110 is only slightly different from the ADVC-100. According to Canopus, they added the powered bus feature to the 110, but got rid of the ability to disable macrovision. Because of these minor changes and because the ADVC-110 and 110 look almost exactly the same, people have been asking if there was a way to still disable macrovision on the 110. Many people have offered suggestions on how to accomplish this. And although Canopus doesn’t officially support this feature on the ADVC-110, we figured we’d give it a try anyway.

How to Disable Macrovision on the Canopus ADVC-110

• Press and hold the Input Select button on the front panel for about 15 seconds • While holding, your captured image will freeze • When the video starts playing again, you can stop pushing the button. • Macrovision copy-protection is now disabled until you switch off the ADVC-110

This process is pretty much the same as it was on the ADVC-100. We didn’t test this with multiple units; therefore we’re not sure if this will work for everyone. Nor are we aware if Canopus or Grass Valley will continue to allow this awesome feature to keep working. But for now, feel free to bask in the joy of a cool little tweak.

The following info is pertaining to the ADVC100:

To disable MV on the ADVC-100, you do the following:

1. while the tape is in the vcr and playing 2. be sure the advc dip switch is set to Analog -- the Rt blue light will come on 3. turn on the advc, and let it initialize completely 4. make sure tape is playing and observe the advc's red light 4a. if not on, disabling step feature does nothing, so don't waist your time pressing it 4b. if on, then proceed to disable like this: 4c. when RT blue and red light are on, press and hold down silver button for aprox 15 seconds or until the red light stop illuminating. At this point, the MV is disabled -- finished

(One thing I want to point out, and that is, that the advc may respond to different types of MV but depending on how the source vcr outputs the signal. So while the advc responds to one type of MV on your vcr it may not respond to another users' if using a different vcr. This also helps to explain why some users meet with success while others, not)

When I work with vhs transfers and conversions, I may use one of the following scenarios:

ADVC->DVCAM->CapCard or DVCAM->DVCAM->CapCard.

VHS transfer Issues

We transfer VHS tapes using three different machines, the Panasonic AG5210, the Sony SVO-9500MD, and the Samsung SV5000W.  For general transfers we use the Panasonic, for SVHS tapes (Super VHS) use the Sony, and for international format tapes use the Samsung. Transfer VHS to AVI

  1. Make sure the cables are plugged into the back of the correct VHS player.  The other end of the cables should always be plugged into the Canopus.
  2. Make sure the firewire is plugged into the Canopus and that the Canopus is on.
  3. When the Canopus is turned on, SAM should immediately detect a new device and want to open Vegas capture.
  4. Open Vegas.
  5. Select capture video in Vegas
  6. Select 'DV'
  7. Go to preferences and select mange disk space.
  8. Create a folder for the VHS transfer on the X drive (this drive is local to SAM).

Transfer VHS to DVD

  1. Make sure the cables are plugged into the back of the correct VHS player.  The other end of the cables should always be plugged into the Canopus.
  2. Make sure the firewire is NOT plugged into the Canopus.
  3. Turn on the Canopus.
  4. Turn on the Hitachi DVD recorder.
  5. Find the input channel.
  6. Record the VHS tape to the DVD recorder's HDD.
  7. Trim, chapter, etc on the DVD recorder and then copy to a DVD.

Why is there a few lines of noise at the bottom of the captured picture?

The distortion a few lines up from the bottom is called "head switching" which occurs in most helical scan analog videotape formats. It varies in distance (number of lines up) from the bottom and from format to format and machine to machine within a format.

As you apparently know, most TVs crop out at least 5% (often more) of ALL sides of the picture which should also mask the color edging on the left.

Solution:

The only solution to the lines of noise is to mask the noisy areas with a black mask.  Don't crop as this will degrade the picture quality.

When using the Sony player the the tape plays too fast or does other weird things!

Use the Panasonic as some standard VHS tapes do not seem to like being played in the SVHS player.

When using the Samsung SV5000W little meteors on the screen

These are caused by a grounding issue with the VCR.  Usually some twisting of the VCR will clear those up!

Web Streaming Service

Being able to offer web streaming is something that not a whole lot of people do.  I always knew we *could* do it, but I researched several ways of approaching the topic, and came up with a really solid and free way to do it.  Some really good documentation came from this first link:

It tackles the topic at a basic level and walks the reader through using free Adobe software to accomplish the task.  It's actually unbelievable that you can get it all for free!

I'll try and outline it in a few steps here.

Install the software

  1. Install Flash Media Development Server 3.5 (found on our systems at "E:\All Users\Downloads\Adobe\Flash Media Development Server\3.5\FlashMediaServer3.5.exe").  At the end of the install, don't let it start the server on computer startup.
  2. Install Flash Media Live Encoder (found on our systems at "E:\All Users\Downloads\Adobe\Flash Media Live Encoder\3.0\flashmedialiveencoder-v3.msi")
  3. You might also need Adobe Flash CS4 Professional.
  4. For learning how the programs work, refer to the URL above for a basic level understanding.

Connection & Setup

  1. Before beginning, make sure you will have an internet connection.
  2. Next, you must make sure that the flash file on the host website is up to date with the public IP address that you will be connecting from.  If there has to be any port forwarding, make sure it's configured beforehand.
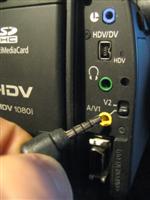
  3. img_4842-custom-2Plug your camera into a computer.  I couldn't get a high-definition video stream to work, so I had to take an analog line out of the camera and run it through the Canopus box into the computer.
  4. Start the Adobe Flash Media Server (you can get to it via the start menu to start and stop the service)
  5. Open Flash Media Live Encoder and begin streaming.
  6. It should be live on the website.

When configuring the Live Encoder, you shouldn't change to much unless you know what you're doing.  It might help to have a Bitrate Calculator handy