
Grading Is Staying the same from clip to clip
Under the Job parameters, check to make sure that the grading is "per clip" and not "per output"
LHF KNOWLEDGE BASE
Hindenburg Over New York
Grading Is Staying the same from clip to clip
Under the Job parameters, check to make sure that the grading is "per clip" and not "per output"
Overview Sometimes it is necessary to rewind a VHS tape manually.
Options Tried
We tried rewinding in a VCR and it got stuck in two different machines!!!
We tried rewinding the tape in the VHS cleaner and it did not move.
Solution
We rewound the tapes manually using:
electric drill (one end of socket bit into chuck), socket bit (big socket set - one of the bits - left or right most - in those little bit trays), plug bit into smallest sized long extension, extension "plugged" into 8mm brass adaptor, and brass adaptor fits into VHS reel hub. Make sure to push in release (screw driller into hole in back of cassette - middle near top).
TRY BY HAND FIRST with the extension and etc before trying the drill as you have more control if something goes wrong. Once it works by hand then use the drill.
Note
This should work on other tapes, but the extension and brass piece may need to be changed so as to fit the tape reel hub.
PLEASE ADD further procedures for other types of tapes.
Overview If you looked at a standard audio CD you would not find wav or mp3 files but cda files. If you just copied these to the computer you would end up with a bunch of 1kb files and no audio.
A data CD would actually shows the files with the standard extensions such as mp3, wav, or whatever.
Solution
Use the Vegas import function to properly rip the audio tracks. If you have a lot of CDs to do, you can run multiple copies of Vegas to use the multiple drives on Xavier.
Overview One of my customers occasionally asks me to record a TV program as her daughter is an actor and she would like to use the program clips for her portfolio.
Equipment (Rack#1 equipment and setup)
Solution Summary
Plug the Telus box into the network. The output from the box goes into the switch box that in turn feeds to the Canopus and the firewire to Space. Vegas records from the firewire. The TV monitor will monitor the output from the Canopus.
How To
Overview Playing back a AVI file on a HDTV or 4K TV or TV. Most TV's do NOT play back AVI files easily or at all. We create the AVI files when we capture videos. So, if the customer wants to play these back directly on a SmartTV we need to provide them with an MP4 file.
Solution
Create an MP4 file using Aimersoft Video Converter Ultimate (on Apollo2). Use the settings "HD MP4" and "High Quality" for a large MP4 file or if we need a smaller file we can use "small file". When setting parameters for transcoding, keep the resolution in mind....the same if possible. Change parameter details in the settings icon.
Overview Every time I started a new explorer, explorer crashed. According to the error in the event logs it looked like ffdshow was causing the crash.
Tried
Download ShellExView and disabled all the extensions that were not Microsoft to see if one of these extensions were causing the crash. Didn't change anything.
Found
I realized ffdshow was probably crashing because it was trying to open something (video file) it did not like (corrupt?). I'd been playing a lot with codec's recently to get an AVI file out of ScanStation mov files and this probably initiated the issue. The "Quick access" folder had a file(s) in it that was causing the crash.
Solution
Search for Explorer options. Clear "Quick Access" history.
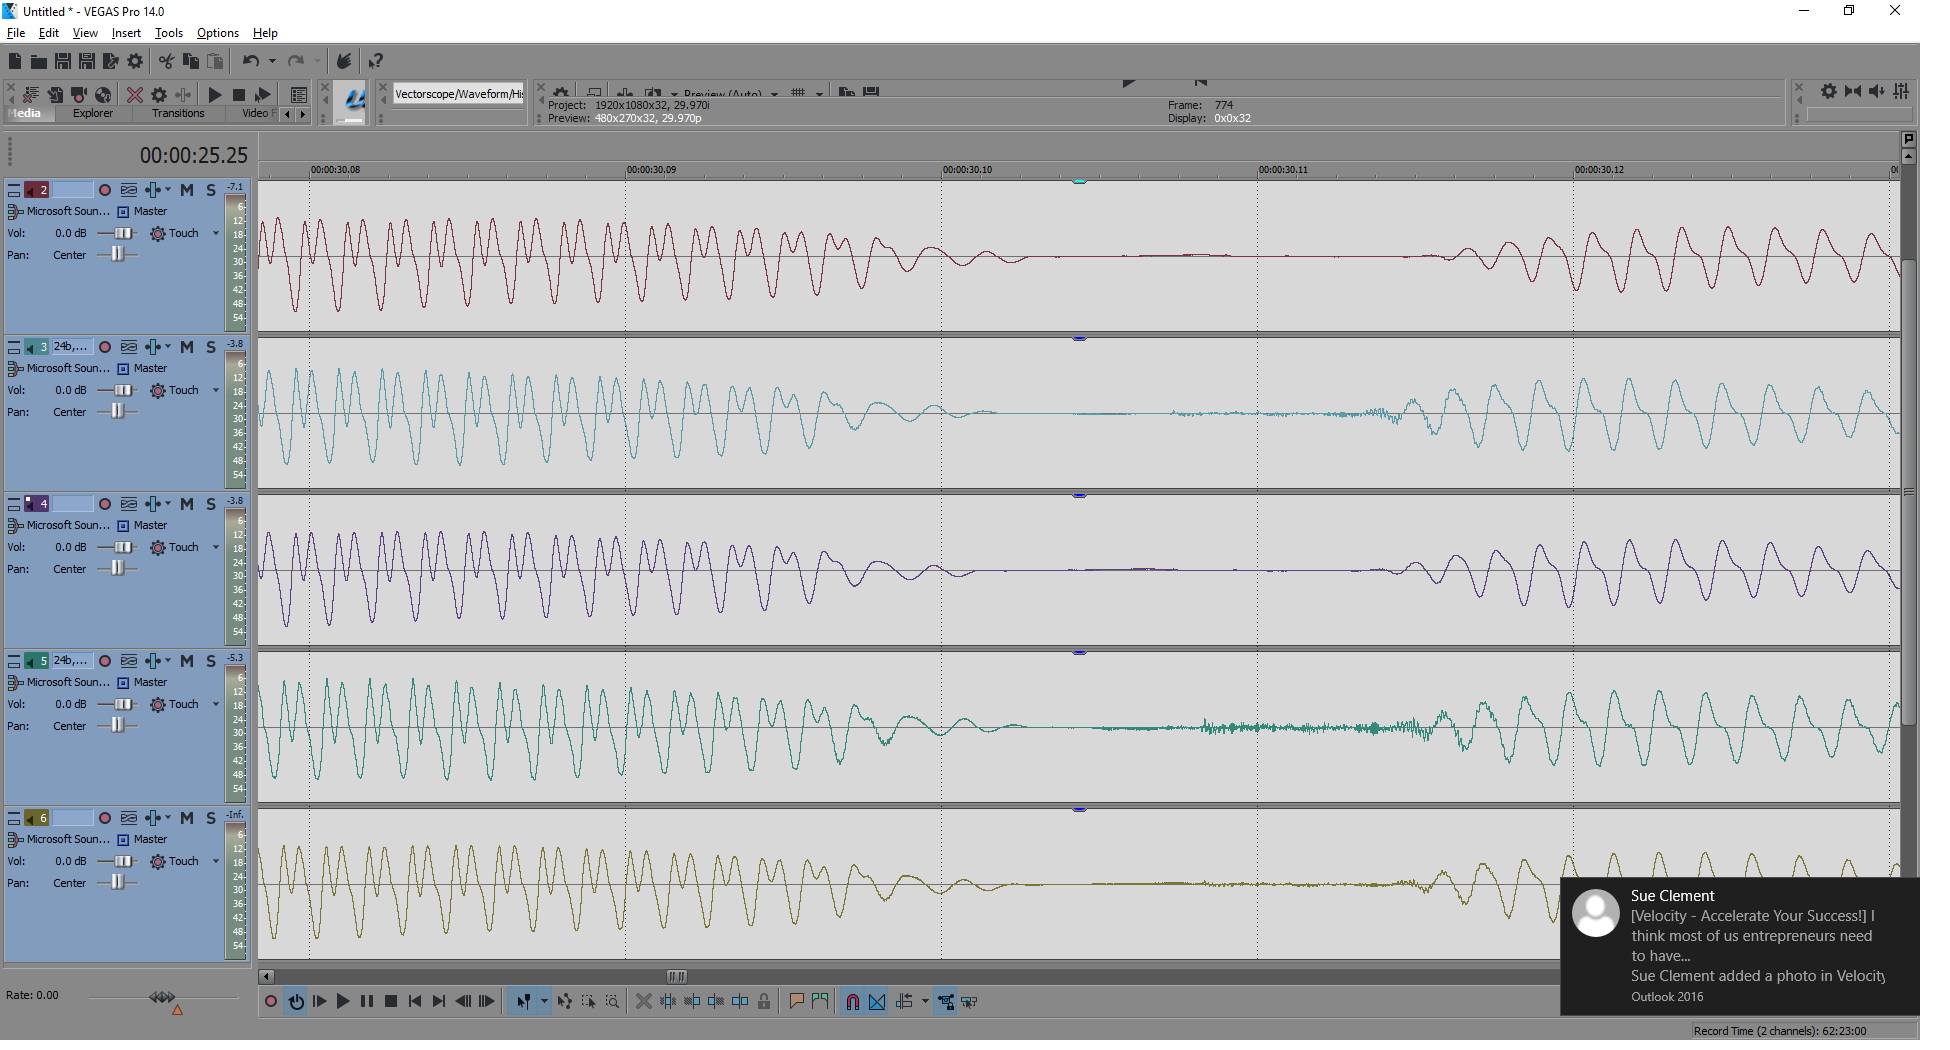
Overview When recording audio, vinyl, audio cassettes, or reel-to-reel, we should be recording in the highest possible rate; 24bit and 96KHz.
More Info
Spoke to John Sawa ( www.johnsawa.com ), an audio editor. Asked what the different is between 16bit and 24bit and 44KHz and 96KHz. As he explained, if you have the higher rates, you have more room to work with if you are trying for fix the audio. If the audio is really good, it will not make much difference.
Test
Ran a test of a BC Library audio book and found the different options made very little difference. Ran combos of 16bit and 48KHz and 24bit and 96KHz. Also, with the 24bit option I tested Dolby C on and off. The conclusion was that the 16bit and 24bit combos made no difference. The tape quality was good so that may have impacted the results. Dolby C off made the low noise bits in the recording a little more defined and the vocal bits made no difference. Here's a Vegas screen of the wave files (1st line 16bit,48KHz with Dolby C, 2nd pair 24bit, 96KHz, with Dolby C, and 3rd pair 24bit, 96KHz, no Dolby):
How
When you set up Vegas, make sure the properties of the project have the audio set to 24bits and 96KHz.
Overview Need to generate a tone or a sine wave tone. I needed this tone so that I could create a cassette with a tone for checking the speed of a cassette deck.
Solution
http://www.wavtones.com/functiongenerator.php
This website can create any tone and then use Vegas to create a longer version.
Objective: To get the highest quality transcode possible specifically focused on ProRes film transfers.
Resources:
4K ProRes 422HQ
2K ProRes 422HQ
4K smartTV Samsung
Current Myffmpeg and ffmpeg
Results:
MyFFmpeg parameters:
These parameters seem to work fine with our 4K TV:
4:3/SD - 720 x 480 16:9/HD - 1920 x 1080
2K - 2048 x 1556
4K - 4096 x 3116
Overview Some VHS tapes have both standard and Hi-Fi audio tracks. This amounts to 4 channels (2 stereo pairs) of audio.
Capture Information
Capturing these VHS tapes can only be done on a Hi-Fi vcr, Sony SVO2100. Need to make sure the 4 cables are connected to the Blackmagic 4K Studio audio connections 1 to 4. You can capture the 4 tracks using either BM Media Express or Vegas. Vegas capture needs to be done using the HDV option. The MXF container can handle up to 8 tracks of audio. AVI does not handle more than 2 tracks of audio.
Capture Setup
Render Information
Sometimes it becomes necessary to trim or edit the multi-channel MXF files. Drop the video and audio onto the timeline. Duplicate the audio track. Under the channel option make sure the second track is set to channels 3/4 (the first track will default to 1/2).
Then you need to assign the stereo tracks to Bus A and Bus B.
Then you need to go to the "render as" and select the MXF render. Check the "view all options" at the bottom of the render window. Now you can check the "enable multi-channel" and open the multi-channel window. Select the bus's (ie. A and B...not mono ones).
When you select "enable multi-channel", the multi channel renders appear in the list. Select the "NTSC MPEG IMX 50 - 4 channel" option as this one already has 4 channels set up to render. Obviously if you are rendering 8 channels....select the 8 channel option. In our case here we are only playing around with 2 stereo tracks, ie. 4.
Now go to render template's audio tab and select the number of channels (ie. 4).
Now render. Confirm that the mediainfo shows Channels: 8 channels, Channels_original: 4 channels.
Reference:
http://johnrofrano.com/training/video-tutorials/multichannel-render-template-in-vegas-pro/
An issue found with the My Panorama program not being able to find matching parts in two obviously overlapping photos that need stitching is solved. I had found that the 2 images need to be relatively the same size. The solution is to Resize one or the other images to match pixel size as closely as possible with either the height or the width (whichever is the matching side of concern).
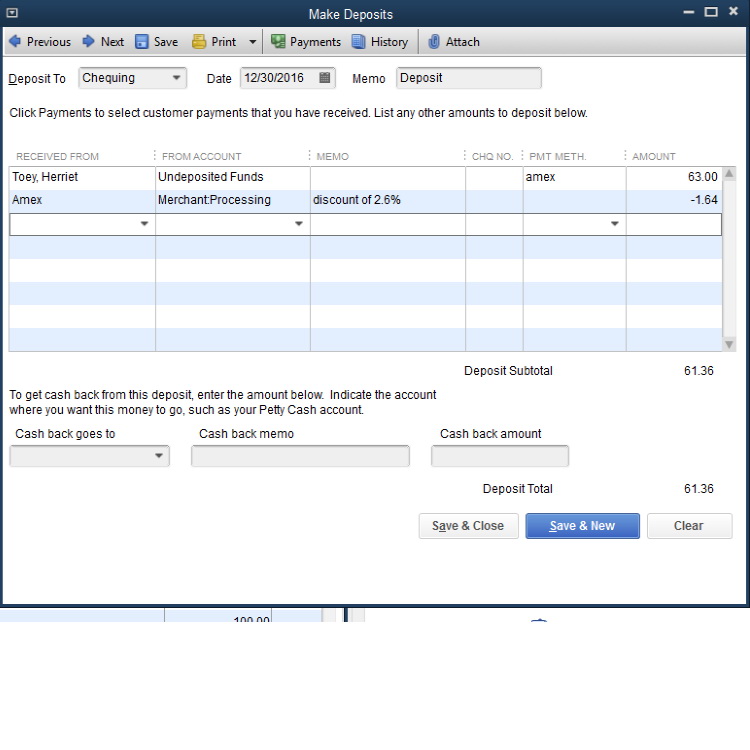
Overview AMEX (American Express) transactions require a discount to be applied when they are deposited into the chequing account. So here is how the Make Deposit screen should look (the rate was 2.9% and changed in 2016 to 2.6%):
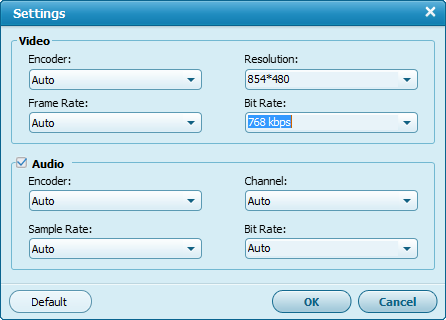
Overview City had DVCAM tapes from council meeting taped by Shaw. It was supposed to be streamed on to the internet. They asked me to digitize the tapes and create videos of 768 Kbps video and 128 Kbps audio and 44.1KHz and aspect of 854 x 480.
Issues
Found that trancoding DVCAM using myffmpeg or Vegas ended with the audio being out-of-sync! Using the Amerisoft program worked.
Additionally we were asked to trim the second tape to about 12 minutes ....we digitized about 3 hours and found that was old recordings. Using Amerisoft Video Converter we can trim tape 2 and merge the tow tapes. The end of tape 1 went into rewind of the DVCAM. Amerisoft trim doe not work well in these scenarios so I trimmed the MP4's from Amerisoft in Vegas.
Solution
Use the Amerisoft Video Converter Ultimate. Update the Facebook (select internet/web) parameters:
Overview Accidentally deposited personal cheque into the business account. Obviously to reslove this I transferred the cheque amount from the business chequing to the personal chequing. Now how do we fix Quickbooks to reflect this mess.
Solution
|
Hi CB here are the entries: Debit Bank account $$ Credit Petty Cash $$ Then in the same entry or another: Credit Bank Account $$ Debit Petty Cash $$ These are all GJ entries, there is no attribution necessary. __________________
Colorado Springs and Eastern Washington
QB Pro 2016 used for two farms and personal
 |
|
#9
|
|||
|
|||
|
Solution
Well, I decided to not go the Petty Cash route because it didn't accurately describe the actual transaction (i.e., the $75 did not go into Petty Cash, etc.). Here's what I ended up doing. I created a Clearing Account (acct type Bank) to be used for bank errors, etc. In Make Deposits, I added a line to the deposit of checks where I put the name of my bank in the Received From field, the Clearing Account in the From Account field, a description, and the amount, and then clicked Save. This resulted in an increase of $75 in the checking account and a -$75 in the Clearing Account. To record the online transfer of the funds out of the account, I did a Transfer of Funds from the checking account to the Clearing Account. This effectively zeroed out both. Thanks for all of your suggestions! |
Overview A customer got some U-matic tapes scanned and had trouble importing the files into Windows Movie Maker.
Facts
The customer was using an older PC with Windows XP 32 bit os. We suspect that he was using an old version of Windows Moive Maker (WMM). He tried to upgrade to 2016 version and it failed.
Umatic tapes were captured using Black Magic Design (BM) Media Express via the BM Studio 4K card. Captured using NTSC and 8bit YUV AVI codec. This resulted in a file UYVY (16bpp uncompressed YUV 4:2:2) codec in an AVI container.
The customer also had a MOV version of the file that Finale created from a 1" tape copy. This was a SD ProRes HQ (ProRes vers 0 422 HQ) in a MOV container.
We also created a MP4 from the ProRes which created a AVC YUV 4:2:0 (H264?) version with a AAC audio codec.
Testing
Tested our 32 bit os WinXP and WMM on Flag.
Tested all the versions above (MOV, AVI, MP4) and none worked with the WMM. The MOV and MP4 errored when loading. The AVI failed to laod with the AAC audio codec. We change the AVI to a AC# audio codec and the video "loaded" but the image was black!
Solution
What worked was a FFV1 codec and AC3 audio codec in a AVI container! FFV1 and PCM codecs also worked fine.
Thanks for asking about ScanDigital….it gave me a challenge to have a quick look at what they do. I had a little further look at ScanDigital and from their description it appears that they may use claw and sprocket based technology and it seems to imply their 0.34 per foot is SD and 0.44 is HD (BTW that is USD!). It really does not state what they use and what technology…except they say projection and LED technology. My guess is that they use a projector with LED light source. The quality of the output is vague and they have no examples. They do state that they do all their work in a facility in Indianapolis, Indiana but in a number of other parts of their website they talk about scanning in Los Angeles (conflicting info). They certainly do not do 2K or 4K.
Overview A customer (Diane Sparks-Cassidy) complained that I was charging too much. Customer wanted films on DVD and digital. I charged $21.99 per 50ft plus $6.49 for audio. She said that Photo Express would do it for $10 per 50 ft. to DVD only.
Photo Express
Called them and spoke to Marcel. The rate is $10 per 50 feet plus a onetime $50 setup fee. Marcel stated that films are not good quality so do not expect much. They do not fix the too dark or too bright or shakiness, etc. They DO NOT do frame by frame….”…that would be way too expensive”.
It takes 10 to 20 days because they have to send it to Toronto.
Question:
Can they put the film onto a flashdrive or? He’ll check and I am to call him back in a couple hours. $15 setup fee plus cost of flashdrive.
1600 – 1800 feet on each dvd.
Also need to ask if they can handle audio? NO
Summary
So, there you have it...poor quality. No audio. No frame-by-frame, etc.
Overview Scanning VHS or VHS-C can be done into DV codec and AVI container or FFV1 codec and AVI container. For now this is a description of scanning to FFV1 on Rack#1.
Input
Tape input can be via the following VCRs: VHS, S-VHS, VHS worldwide
Output
Output will be onto SPACE.
Video Path
From VCR --Svideo--> switch box --Svideo--> DPS-295 --component--> BM Decklink Studio card in SPACE
Audio Path
From VCR --RCA--> switch box --RCA--> BM Decklink Studio card in SPACE
Steps
 04-15-2013, 11:43 AM