DVD

Rip Audio CD's or CD-R's

Overview If you looked at a standard audio CD you would not find wav or mp3 files but cda files.  If you just copied these to the computer you would end up with a bunch of 1kb files and no audio.

A data CD would actually shows the files with the standard extensions such as mp3, wav, or whatever.

Solution

Use the Vegas import function to properly rip the audio tracks.  If you have a lot of CDs to do, you can run multiple copies of Vegas to use the multiple drives on Xavier.


DVD Media Research - Gold, M-Disc

Overview: Noticed a new DVD with longevity claims of 100 years plus called M-Disc.  Is there a need to offer archival type of discs?

Media:

  1. MAM-A Gold archival discs
    1. 100 year plus longevity
    2. Inkjet hub printable available
    3. 4.7GB of data
    4. 8X
    5. $1.48 each at 50 disc package (wimmedia.com)(clearance)
    6. $2.81 each at 50 disc package not on clearance...can get these for around $2.00 each elsewhere?
  2. Falcon Gold archival discs
    1. 100 year plus longevity
    2. Inkjet hub printable available
    3. 4.38GB of data
    4. $1.62 each at 50 disc package (wimmedia.com)
  3. M-Disc
    1. 100 year plus longevity
    2. more robust than Gold
    3. not dye based
    4. 4X
    5. 4.7GB data
    6. special burner required
      1. LG for $25 at NCIX (Feb 2012)
      2. LG BluRay for $85 at NCIX (Feb 2012)
    7. $2.80 each at 25 disc package (NCIX)
    8. $2.99 each at 10 disc package (NCIX)

Costing versus return:

With standard DVD's running at 0.32 per DVD and water-shield at 0.76 and Gold at $1.48 (or $2.50).  Pricing for archival discs could be at $19.99.... returning $18.51 for each copy.

16:9 HD Video Output As 4:3 HD or SD

Overview A film transfer customer wanted their output in two formats:

1)            16:9 HD on a Blu-ray and 16:9 SD on DVD

2)            4:3 HD on a Blu-ray and 4:3 SD on DVD

The footage is and has been editied in the highest resolution and we did not want to loose quality by zooming in or such.  What I wanted was to crop the sides of the 16:9 image to a 4:3 image without loosing any of the top and bottom.

The original image is 1920 x 1080 (16:9) and needs to go to 1440 x 1080 (4:3).

Steps:

  1. Create a copy of the original 16:9 vegas project and name the new one 4-3 or something like that.
  2. Here’s the typical HD properties window(.....missing pic):
  3. Change the new 4:3 project properties to:
    1. Leave the “Template” as is.
    2. Change the “Width” field to 960 and the “Height” to 720 and other properties fields will automatically adjust....such as the “Template” and “Pixel aspect ratio” fields.
    3. Click the “Apply” button.
  4. Select the “Event Pan/Crop” tool to adjust the image to a 4:3 image.  This must be done for every event in the project (Ultimate S matches aspect to the project aspect however it zooms in to do it and we want to crop the sides so that we do NOT loose quality).
    1. Change the “Width” field under the “Position” group from 1920 to 1440.  This will cause the left and right sides of the frame to move in and the top and bottom to remain fixed.
  5. Render the footage using the follow “render as” settings.  This will render the footage out as 4:3 and will fill the frame...no black bars.
    1. “Template” set as “Blu-ray 1440x1080-24p, 25 Mbps video stream”
    1. “Render loop region only” checked.
    2. “Save project markers in media file” checked.
    3. NOTE: Blu-ray does not support 29fps and therefore DVDA will recompress the entire video.  24fps (23.976) is supported.

NOTE: For 4:3 HD rendering out for a DVD

  • Make sure to not to select the "stretch video to fill output frame size (do not letterbox)"
  • Also, if the project is using tracks for bars in the output (which an HD project must have for HD 16:9), then the bars MUST be turned off if rendering as 4:3 for DVD.

(dated) Printing DVD Case Covers & Disc Surfaces

Tools Used in this Process

DVD Media Taiyo Yuden DVD-R 4.7 GB White Ink Hub Print 16x
Case Cover Paper Kirkland Professional Glossy Inkjet Photo Paper
Printers Epson R260 (Primary), Epson R220
Software Adobe Illustrator, Adobe Photoshop, Epson Print CD

Locating the Files

If the project has been backed up, you will find the labels inside the following folder:

  • Disc Surface: E:/TMM/Labels/#Project Number# - #Project Name#/Disc Surface.ec3
  • Case Cover: E:/TMM/Labels/#Project Number# - #Project Name#/DVD Case Cover (Edit *).psd
  • or Case Cover: E:/TMM/Labels/#Project Number# - #Project Name#/DVD Case Cover (Edit *).ai

If the project is still active, you will find them at:

  • Disc Surface: K:/#Project Name#/Labels/Disc Surface.ec3
  • Case Cover: K:/#Project Name#/Labels/DVD Case Cover (Edit *).psd
  • or Case Cover: K:/#Project Name#/Labels/DVD Case Cover (Edit *).ai

Printing DVD Case Covers from Illustrator

  1. Open Illustrator file
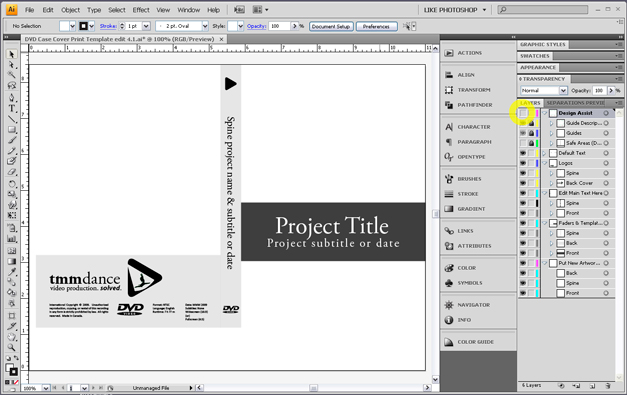
  2. Turn off "Design Assist Layer."

    illustrator-print-01

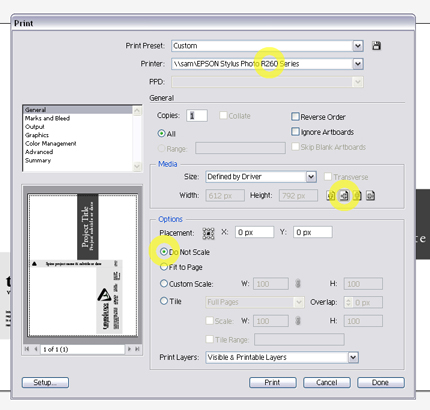
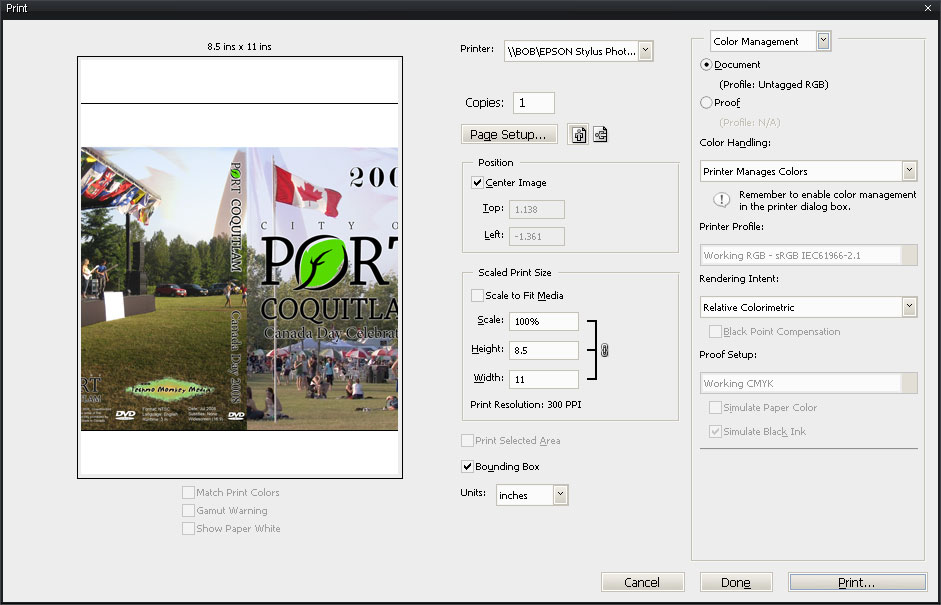
  3. In the main menubar, click on FILE then select PRINT.  It will bring up the print dialogue as seen below. From top to bottom of the dialogue, check that the printer is set to EPSON Stylus Photo R260 (preferred), check under the "media" section that the first landscape orientation button is selected, and check that under placement "Do Not Scale" is selected. For most cases, leave Print Layers to "Visible & Printable Layers."illustrator-print-02
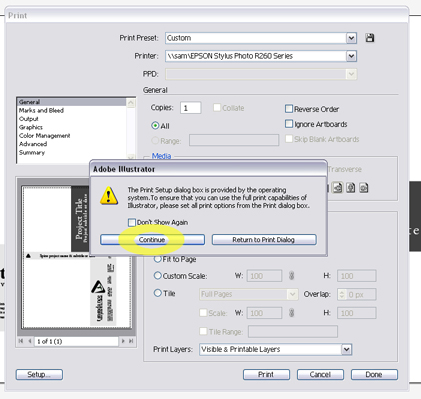
  4. Click Setup in the bottom left corner of the print dialogue. The following message may display. If it does, click continue. If not, then proceed to the next step.illustrator-print-03
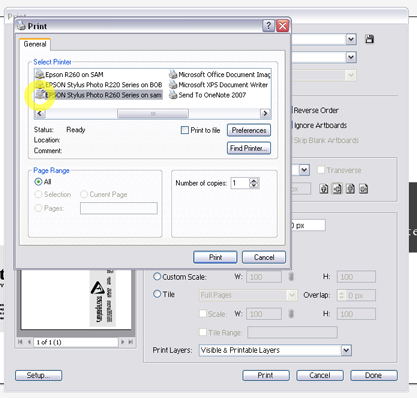
  5. The windows printer dialogue box will appear. Make sure that the same printer is selected from the earlier steps. (Epson Stylus R260 from this example) Click the Preferences button.illustrator-print-04
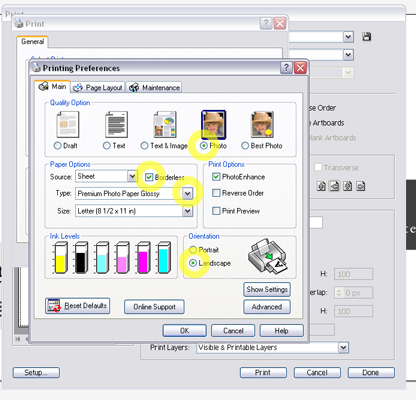
  6. The preferences dialogue will open. Set Quality to "Photo." Set Type to "Premium Photo Paper Glossy." Check Borderless on. Note that Landscape orientation should be set automatically.illustrator-print-05
  7. Click "OK" from the preferences dialogue. From the Windows print dialogue, click "Print."
  8. Now that you are back in Illustrator's dialogue, choose the number of copies you want to print and place that many glossy photo paper sheets into the selected printer.
  9. Finally, click "print" from Illustrator.

When you have a few printed and you're ready to cut and bag 'em, check out the process for Assembling DVD Cases.

Printing DVD Case Covers from Photoshop

    1. Open Photoshop file
    2. Make sure the Guides Layer is turned off.
    3. In the main menubar, click on FILE then select PRINT.  It will bring up the print dialogue as seen below.

      default-print-screen

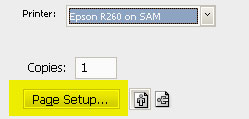
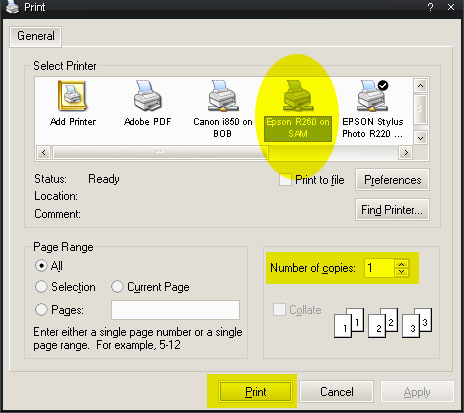
    4. Select Printer (preferred printer is the Epson R260 on SAM) and click on Page Setup.

      page-setup

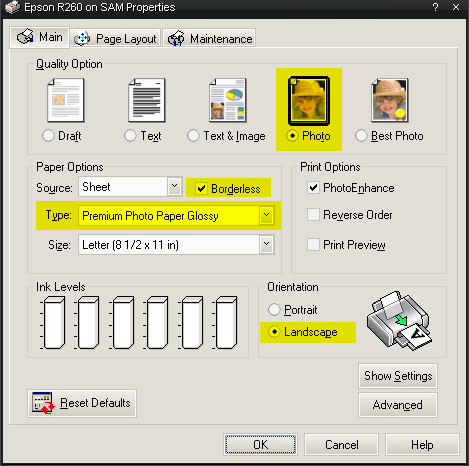
    5. page-setup-settingsSet the options for the printer.  The following settings are for the Epson R260, and most settings are the same for the Epson R220.Quality Option: PhotoType: Premium Photo Paper Glossy (for R220, this is Premium Glossy Photo Paper)Borderless: check the box (must be done after selecting Paper Type)
      Orientation: Landscape

    6. Press OK to close dialogue box.
    7. You will be back in the print dialogue (seen in step 4), and push Print to continue.
    8. At this stage, Photoshop is sending the document to the final dialogue.  Before continuing, get up and off the computer and put the desired number of sheets of  inkjet photo paper into the printer you selected back in step 4.
    9. Back on the computer, verify the printer is the same that you chose back on step 4.  If it isn't, then hit Cancel and start back from step 3.  That typically fixes this rare bug.

final-print

  1. Choose the number of copies you want to print.  This should be the same as the number of sheets you put in the printer in step 8.
  2. Push Print.

When you have a few printed and you're ready to cut and bag 'em, check out the process for Assembling DVD Cases.

Quick Printing DVD Case Cover Tips

  • Instead of going through the menu on step 3, press CTRL+P to bring up the print dialogue.
  • After you've specified the settings once, they should be the same the next time you open the print dialogue.  This should work even if you open another cover to print, but you will have to start over if you close Adobe Photoshop.

Printing Disc Surfaces

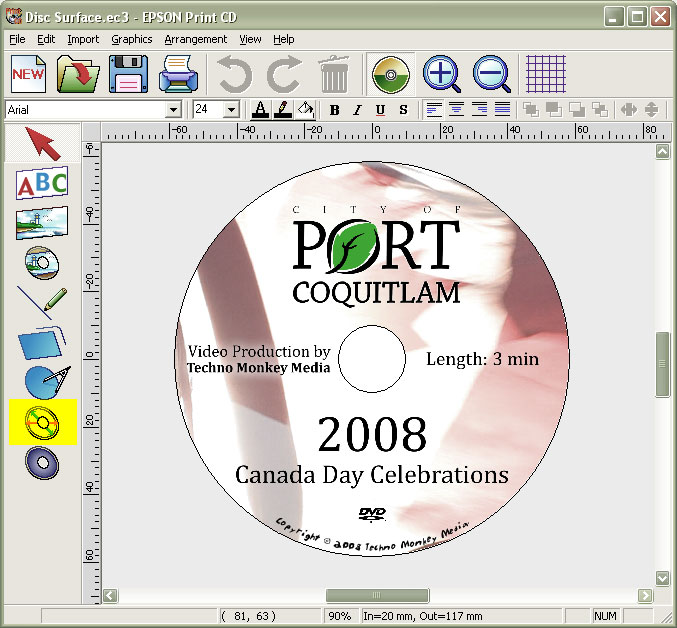
    1. Open Epson Print CD using one of two methods.  Either double click on a Disc Surface.ec3, which will open the Epson Print CD program with the file ready to print, or open the Epson Print CD program (from the start or program menu, and then drag the jpg disc image onto Epson Print CD's print image.
    2. Open the Inner/Outter Diameter Setting, by clicking on the yellow disc icon in the left toolbar, as highlighted in the screenshot below.

      where-is-button

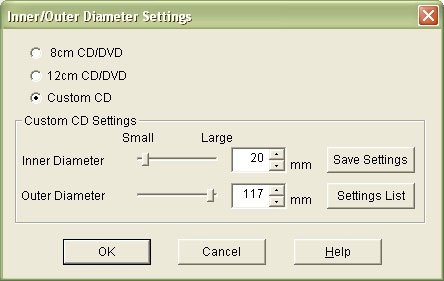
    3. Ensure the Inner Diameter and the Outer Diameter are set correctly using the following table of media as a guide.

diameter

Taiyo Yuden DVD (Most Common) Inner: 20, Outer: 117
Tiayo Yuden water-shield DVD Inner: 23, Outer: 117
RiData DVD Inner: 20?, Outer: 117?
CDR's Inner: 20?, Outer: 117?
    1. Press OK, and return to the main window.
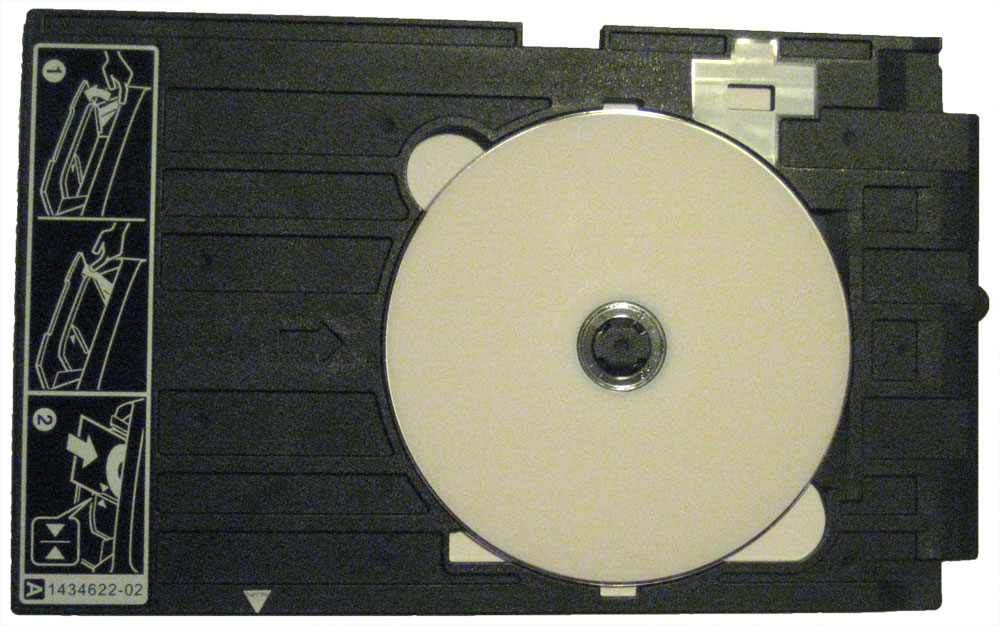
    2. Get up and off the computer and grab your inkjet printable disc. Place it in the holder tray as seen below.

      disc-tray1

    3. If the printer is not switched to print discs, you will need to switch it.

      [flv width="320" height="260"]http://www.lifetimeheritagefilms.com/knowledgebase/wp-content/m_uploads/2008/12/setting-up-printers-for-disc-printing_400kbps.flv[/flv]

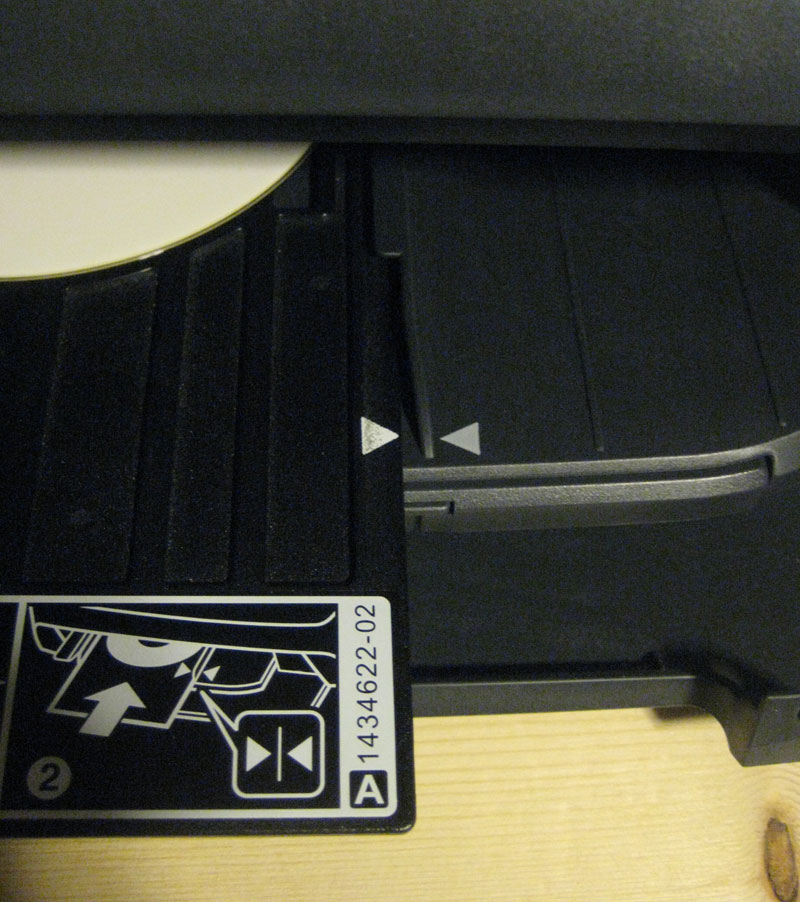
    4. Insert the tray into a printer, matching up the two white triangles.

line-up-triangles

  1. Back on the computer, press the big print button up in the top toolbar in Epson Print CD.
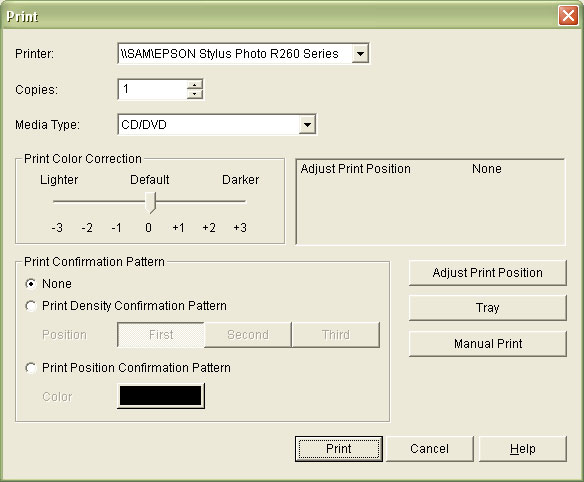
  2. Make sure the printer selected is the printer you put the disc in, then push Print.

    print-box

  3. You will always be prompted with an are you sure warning box - push OK.

    are-you-sure

  4. Your disc will begin printing.  It should take about two minutes to complete.
  5. Take the disc out of the tray and place it in a spindle.  Make sure that it is obvious that the spindle is for completed discs by labeling it with a sticky or piece of scrap paper.
  6. Go back to Step 5 and repeat until you have printed the desired number of discs.

Quick Printing Disc Surface Tips

  • When you're certain that your settings are correct in Epson Print CD, you can glaze over steps 8 thru 10 by just pushing CTRL+P then  ENTER, then ENTER again.  The program may lag for a sec, but you will be free to go back and swap more discs.  This helps because when your in the mad rush of swapping discs, the only interaction with the computer will be jumping over to push that combination really fast.  Don't worry about speed either, I haven't yet done it "too fast".