vegas

Betacam or Betacam SP Processing via Intensity Pro

Equipment Sony Betacam SP  PVW2800 record, edit and play deck

Digitize

  • Currently, I set up the deck connected to the component and left and right audio channels to the Intensity Pro card in Flag.
  • Opened Sony Vegas and used the "HDV and SDI" capture option.
  • Set the preferences (icon in the right-hand corner of the window) in the capture window to:
    • Device: "Blackmagic Design Decklink"
    • Capture format: NTSC Standard (720x486, 29.97 fps)
  • Select the "encoding":
    • MPEG IMX MXF
    • 8-bit YUV AVI
  • select the folder that you want record the footage to.

Encodings

  1. MPEG IMX MXF
    1. Specs: Video 720x486x32, 29.97 fps interlaced, 50 Mbps Audio: 16 bit, 48KHz, 8 channel, Linear PCM
    2. 0.5 GB per minute
  2. 8-bit YUV AVI
    1. Specs: Video 720x486x24, 29.97 fps interlaced, uncompressed Audio: 16 bit, 48KHz, Stereo
    2. 1.25 GB per minute

16:9 HD Video Output As 4:3 HD or SD

Overview A film transfer customer wanted their output in two formats:

1)            16:9 HD on a Blu-ray and 16:9 SD on DVD

2)            4:3 HD on a Blu-ray and 4:3 SD on DVD

The footage is and has been editied in the highest resolution and we did not want to loose quality by zooming in or such.  What I wanted was to crop the sides of the 16:9 image to a 4:3 image without loosing any of the top and bottom.

The original image is 1920 x 1080 (16:9) and needs to go to 1440 x 1080 (4:3).

Steps:

  1. Create a copy of the original 16:9 vegas project and name the new one 4-3 or something like that.
  2. Here’s the typical HD properties window(.....missing pic):
  3. Change the new 4:3 project properties to:
    1. Leave the “Template” as is.
    2. Change the “Width” field to 960 and the “Height” to 720 and other properties fields will automatically adjust....such as the “Template” and “Pixel aspect ratio” fields.
    3. Click the “Apply” button.
  4. Select the “Event Pan/Crop” tool to adjust the image to a 4:3 image.  This must be done for every event in the project (Ultimate S matches aspect to the project aspect however it zooms in to do it and we want to crop the sides so that we do NOT loose quality).
    1. Change the “Width” field under the “Position” group from 1920 to 1440.  This will cause the left and right sides of the frame to move in and the top and bottom to remain fixed.
  5. Render the footage using the follow “render as” settings.  This will render the footage out as 4:3 and will fill the frame...no black bars.
    1. “Template” set as “Blu-ray 1440x1080-24p, 25 Mbps video stream”
    1. “Render loop region only” checked.
    2. “Save project markers in media file” checked.
    3. NOTE: Blu-ray does not support 29fps and therefore DVDA will recompress the entire video.  24fps (23.976) is supported.

NOTE: For 4:3 HD rendering out for a DVD

  • Make sure to not to select the "stretch video to fill output frame size (do not letterbox)"
  • Also, if the project is using tracks for bars in the output (which an HD project must have for HD 16:9), then the bars MUST be turned off if rendering as 4:3 for DVD.

Vegas - Adjusting Film Side Bars

Overview:On a Vegas film project template we use two separate video tracks that create black bars on the left and right of the image to hide the sprockets and film edges.   One video track creates the bar on the left and the other video track creates the bar on the right.  Every now and again these bars do not cover these areas correctly. Here's how to change them.

Adjusting the Bars:

  1. <right-click> with the cursor placed on the video track that needs adjusting.
  2. <select> "Edit Generated Media"
  3. The generated media is a "Sony Color Gradient".  There are three "control points" that make up the gradient.  Typically when you open the Color Gradient it will show a number "1" in centre of the color gradient window.   The "Control Point Properties" window on the right will start with the "Distance" parameter.  We need to be IN ANOTHER DISPLAY".
  4. Under the "Control Points" window there are six buttons (+, -, <-, ->,...etc).  Click on the "<-" button.
  5. The "Control Point Properties" window should now start with a "X:" and "Y:" boxes with the values of 0.500 in them.
  6. Adjust the "X:" value to change how far or how little the bar moves across the image.  For example, 0.4 will occupy a sliver along the edge of the image, whereas a value of 0.85 will cover almost half the image.

Sony Vegas - Interlaced Files Producing Jaggies In Motion

Problem: Copied files from a Samsung SD camcorder's SDcard and threw them on the timeline.  Rendered and used DVD Arch to create a DVD.  When playing the DVD on a PC you can see some artifacting if you look close when there is movement.  However, when playingthe DVD on a DVD player and a CRT TV, the artifacting during movement turns into jittery and jumpy interlace-like affects.

Investigation:

First of all, the codec to even read the camcorder's clips was not on the PC.  I had to dump down the CCCP codec package and then Vegas and WMPlayer (it did already play the audio) could see the video.  I also installed Mediainfo and Mediacoder to have a look at the camcorder clips.  Both these programs showed the clips as having a field order of Upper Filed First.  Yet, Vegas was showing the clips as Lower Field First in the Project Media bin.

WARNING: Someone mentioned to me that they would never dump the CCCP onto their editing PC as it could have an impact on current codecs on your system.  I did find that I put this on Flag and I had to remove it because the CineCap VelocityHD pulldown process resulted in the video having white lines jumping across the video...fixed after remoing the CCCP.  I was also warned that removing the CCCP may not completely remove everything.

Solution:

Change the clip properties in the Project Media bin to "Upper" instead of the default of "Lower".  Leave all the other settings, Project Properties, Render properties, as default.  As quoted by someone of the Sony forums when talking about the Project Media properties....

This is independent of the Project Properties or Render Properties, which react correctly assuming the media field order is being reported correctly by the decoder

Author DVD With Clips By Creation Date

Objective: Customer has a hardrive (HDD) camcorder or a flash memory card or an SDcard with a whole bunch of clips.  These clips are named using a sequence number.  The customer would like the clips organized on the DVD menu by date with only one menu item for each date (ie. no multiple dates on the menu).   In many cases there are multiple clips for each date that could subsequently make up a single clip, event, or scene. However we do not want an event for every little clip; we want to perhaps associate each day's events into a menu item on the end result of the DVD.

Dividing the Clips For Each DVD

It is unlikely that a given HDD will all fit on one DVD.  In general HDD clips should be divided into chunks of about 3 to 4GB for each DVD.  For example, a Sony HDD 30GB camcorder with a full HDD will have about 8 to 10 DVD's of data.

Time to Process

To move the clips, place on the NLE timeline, render, author, burn DVD, and create and print covers should take about 30 minutes per DVD or per 3 to 4GB of data (approx 1.5 hours).  30 minutes should equal 50% of our hourly rate....ie. $37.50

Steps:

  1. Isolate and copy the needed clips from the memory or HDD to a working directory.
  2. Use the ReNamer program to rename the clips from the number sequence to a creation date sequence:
    1. run the ReNamer program on the directory of clips
    2. select the directory (folder) or directories that have the clips...this can be selected in one go
    3. Both actions can be done in the same run.  The first action is to rename the clips so that the "last modified Date" is the start (prefix) of the file name and the remainder of the name is the original name. "Click here to ad a rule" will open a dialog box used to create the first rule: A. click "Insert" (it is on the top of the list so should be selected by default. B. To fill the "What:" box click on "Insert Meta Tag and select "File_DateModified" and click Insert. C. "Prefix should already be selected so now click "Add Rule"
    4. The second action is to delete the time part of the modified date.  The can be done by "deleting" columns "positions (the starting position on the "delete" edit rule dialogue box should be set to 12 and the count box should be set for  8; some tweeking may be needed).
    5. Preview and then rename it!
    6. I used the last mod date because the creation date had changed to the current date and the last mod date was still the original
  3. Pull the clips into the NLE
    1. Note: Remember the tips and tricks of Vegas here whereby copying a large selection of files - after selecting the files make sure you grab the first file in the list when moving them to the timeline; otherwise the order of the clips will be all jumbled up!
    2. drop the clips onto a Vegas Pro time-line...this may take a while so be patient. The easiest way is to select all the files from Explorer and drag and drop them onto the timeline.
    3. drop only one to two DVD's worth of clips onto the time-line otherwise you may run into odd "low memory errors" in Vegas. Within a Windows Explorer folder you may add a "Length" attribute as a column to get a quick view of how much time you are dealing with on the selected files.
  4. Creating markers in Vegas/UltimateSPro to use for the menus in DVD Architect
    1. Open Ultimate S and go to the "Markers" tab
      1. Go to "create markers" section
      2. Select - "entire project", marker type "Marker", Naming "Use active take name", and "create markers at events"
      3. Click the "Apply" button
      4. This will create a marker at the start of every event naming the marker the same as the name of the clip
      5. Now unselect create markers - remove check from "create markers at events"
      6. Now save all the markers to a txt file by checking the "Load/Save Markers", with "Markers" from the dropdown list, and "Saver Markers to a File", adjusting the filename to correspond to the project/DVD name. Click Apply.
  5. Use Ultraedit to open the markers txt file that you just created
    1. ...and manually go thru and delete all but the first marker of each date
    2. Change to column mode
    3. Now, delete the sequence number at the end of the marker name and leave only the date portion that will be used for the menu name. Save the file in the project folder.
  6. Ultimate S - go back into the "Markers" tab
    1. Remove all the markers. Check the "Remove Markers", use "Entire project", and check "Markers". Click Apply. Be sure to UN-check "Remove Markers" before the next step.
    2. Create the "regions" for each DVD on the timeline.... then..
    3. Load the changed marker file back in. Click Apply.
  7. Then, render for the region the video for DVD Architect... which will include the markers to a "render" folder marked corresponding to the resultant DVD #, within the project folder. The preset used will most of the time depend on whether Widescreen in needed or not. These two presets are at the top of the list as A.) NTSC DV with AC3 Audio, or B.) NTSC DV Widescreen with AC3 Audio. Choose as required.
  8. In DVD Architect
    1. Load the rendered video file
    2. Create "scene selection" and it should automatically create the menu items using the markers' names.

Rendering Flash Video Directly From Vegas

The following article is mostly copied directly from
http://www.solovj.com/rendering-flash-vide-with-vegas-pro-2

One of the weaknesses of Vegas Pro is its inability to render Adobe Flash Video files within the application itself.

FLV files are the defacto standard for web video content distribution. I discovered a way to create FLV’s via frameserving from Vegas Pro to On2’s Flix Pro.

What is frameserving?

In layman’s terms, frameserving is the ability to create a reference file within one application and have a second application render from that reference file. Web video journalism is about efficiency and speed. The major post production suites are anything but that from my perspective, whereas Vegas is built for both speed and efficiency.

There are three components to render FLVs from Vegas Pro.

The first is Vegas Pro of course. Second, you need to download Satish’s DeBug Frameserver plugin and install it. The third component is obtaining an application that can render FLV's.  We currently use Adobe CS3's Flash Video Encoder.

The great thing about Vegas Pro is that you can change the properties of the project to reflect the end file dimensions you want to post online (I typically create either a 640×360 or 480×270 square pixel aspect ratio). The other caveat is you need to make sure your audio properties are 44khz 16 bit. Trying to frameserve to 48khz throws an error message and it took asking on the Vegas forums to resolve this virtually unknown glitch. With that established, the process is straight forward for using the frameserver plugin within Vegas Pro.

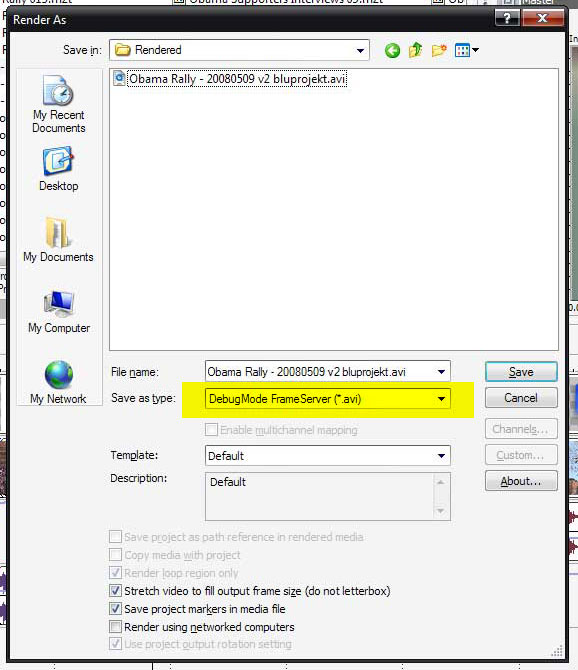
Once you have edited your timeline and are ready to encode, go to File->Render As-> select from the “Save As Type” menu DeBugMode Frameserver (*.avi).
vp8_flv_tutorial1

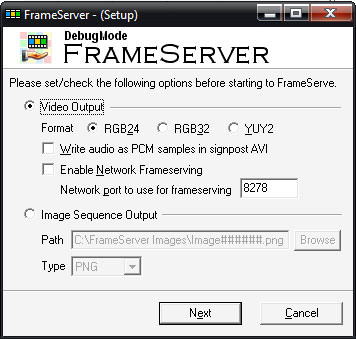
You will be prompted with small window to select various options. I elect to use RGB24 as my video output option.
vp8_flv_tutorial2

Select next, and the frameserver will render a signpost avi file - this is what will be used by your flash encoder to render the FLV. Minimize Vegas and start Adobe's Flash Video Encoder.

Select your input file in the first window and select an option for the name of your output file if needed.  Typically we use the default settings, but you can modify them if you want to.

At this point, Vegas will serve the timeline via the DeBugMode Frameserver plugin to the Flash Video Encoder. Render time will be dependent on the length of your project. Once done, you can watch the FLV file in any player that supports the FLV format (I use Adobe’s Media Player), or just upload it to the web.

Is this as convenient as having integrated Flash Video encoding within a single application? To be honest, I think it is just as convenient, and without the bloat of the other competing NLE applications available. I have successfully used this workflow and it’s faster than Premiere Pro’s integrated Flash video encoding. It may not have all the glitz of advanced features available in other applications, but it gets the job done - and does so with better efficiency - a hallmark trait of Vegas Pro 8 that I have espoused for the solo video journalist paradigm.

Timecode Sync

Being able to sync events on the timeline according to timecode is a feature that is built into Vegas, and would automatically synchronize clips with zero effort. I took some time to research different timecode settings for the Canon XH-A1’s, and ended up performing a few tests. Typically we are running the camera in the default “REC-RUN” format, and I switched it to “FREE-RUN”, which, when synchronized with the second camera, means that both cameras are always displaying the exact same timecode because the counter is always running. Even if the battery is removed. It’s running off the ‘backup-battery’ technically which also basically keeps track of the clock.

The problem turned out not to be on the camera end, as the timecode recording worked great no-matter which setting you had it on. The problem lied within Vegas, as when I looked at the imported clips in the Project Media dialogue, each clip’s “Timecode In” started at 00:00:00:00. This means that the timecode information wasn’t being captured with Vegas’s built in video capture program.

Also, there is an option to synchronize clips according to the date and time stamps, but Vegas didn’t appear to import these either. Online research revealed that it’s even possible to get information from the camera such as the F stop, shutter speed, gain, and more!

In conclusion, I believe that all of this will be fixed in future releases, or with the next camera (probably being tapeless). For now, it’s not a huge issue when we line it up by audio wave-forms, so we won’t make it a priorty to find alternate software to capture this special XIFF data.

As a quick last side note, it looked like Edius might be able to do it.

UPDATE May 12, 2009

After upgrading to Vegas 9.0 the other day, I noticed timecodes in the media bins in vegas!  I played around with it a little and it appears that Vegas can now read the timecode information on all the clips that have been imported from the XH-A1's.  It will need to be tested a little further, but it could become a massive time-saver.