render

Retro Film Output Formats

Currently here is the list of output options from the Retro units:

  • Sequenced jpg's
    • 1920x1080, 0.5MB
  • MP4
    • Sony AVC/MVC 1920x180-30p 16Mbps
    • Use this setting to create the highest quality 16:9 file suitable for uploading to Internet sites. Audio: 128 Kbps, 48,000 Hz, 32 Bit, Stereo, AAC Video: 29.970 fps, 1920x1080 Progressive, YUV, 16 Mbps Pixel Aspect Ratio: 1.000
  • AVI
    • NTSC DV Widescreen progressive 30Mbps
    • Widescreen NTSC DV video files compatible with Sony Video Capture. Audio: 48,000 Hz, 16 Bit, Stereo, PCM Video: 29.970 fps, 720x480 Progressive, NTSC DV Wide Pixel Aspect Ratio: 1.212
  • MXF
    • HD422 1920x1080-24p 50 Mbps
    • Audio: 48,000 Hz, 24 Bit, Stereo, PCM Video: 23.976 fps, 1920x1080 Progressive, MPEG HD422 Pixel Aspect Ratio: 1.000


Sony Vegas - Interlaced Files Producing Jaggies In Motion

Problem: Copied files from a Samsung SD camcorder's SDcard and threw them on the timeline.  Rendered and used DVD Arch to create a DVD.  When playing the DVD on a PC you can see some artifacting if you look close when there is movement.  However, when playingthe DVD on a DVD player and a CRT TV, the artifacting during movement turns into jittery and jumpy interlace-like affects.

Investigation:

First of all, the codec to even read the camcorder's clips was not on the PC.  I had to dump down the CCCP codec package and then Vegas and WMPlayer (it did already play the audio) could see the video.  I also installed Mediainfo and Mediacoder to have a look at the camcorder clips.  Both these programs showed the clips as having a field order of Upper Filed First.  Yet, Vegas was showing the clips as Lower Field First in the Project Media bin.

WARNING: Someone mentioned to me that they would never dump the CCCP onto their editing PC as it could have an impact on current codecs on your system.  I did find that I put this on Flag and I had to remove it because the CineCap VelocityHD pulldown process resulted in the video having white lines jumping across the video...fixed after remoing the CCCP.  I was also warned that removing the CCCP may not completely remove everything.

Solution:

Change the clip properties in the Project Media bin to "Upper" instead of the default of "Lower".  Leave all the other settings, Project Properties, Render properties, as default.  As quoted by someone of the Sony forums when talking about the Project Media properties....

This is independent of the Project Properties or Render Properties, which react correctly assuming the media field order is being reported correctly by the decoder

Process 8mm or 16mm Film

Purpose: This document describes how we process film.  The process includes the following stages:

  • Identify and catalog the film.
  • Make minor repairs.
  • Clean the film.
  • Scan the film.
  • Render the film into the final format.

Before we start any film transfer we do three main things, identify and catalog the film, inspect the physical shape of the film, and clean the film.

Identify and Catalog

Before we catalog the film, we need to make sure the customer information has been entered into the client log, www.lifetimeheritagefilms.com/clients/.  In particular we need at least the name of the client and the email address.  The email address is required if the film process is deluxe.

In the film catalog file, www.film2hd.com/myfilm/ we fill in the boxes in three steps:

  1. Initial information such as the customer name, film id number, and various physical film identification stuff.
  2. While scanning the film, or after scanning the film, we can add "tags" that identify the content of the film for future searching of our database.
  3. After rendering the film we can fill in details such as the length, fps, etc

First let's identify the film:

  1. size of reel (check diameter of reel with film size table) <insert link>
  2. type of film a) Regular 8mm (Reg8) - film is 8mm wide with large sprocket holes on one side b) Super 8mm (Super8) - film is 8mm wide with smaller sprocket holes on one side c) Super 8mm (Super8) sound - film is same as silent Super8 but on the edge opposite the sprockets you will find a very narrow magnetic audio strip d) 16mm silent - film is 16mm wide and has sprocket holes on both edges of the film e) 16mm sound - film is 16mm wide and has sprocket holes on one edge and a optical sound track on the other edge
  3. any identifying marks on the container such as year, title, what is on the film

Inspect Film

Physically inspect the film for:

  1. Mold.  If mold is found <link to process to deal with mold>
  2. Check to make sure film is on the reel correctly (ie. backwards, upside down, etc) - film orientation a) The leader should have the shiny surface up (this may have dull surface up and it really does not matter) b) the film should have the emulsion surface up c) film frame will have the top of the frame nearest the leader d) mount the reel on the right rewinder (dead post) e) the sprockets must be on the far edge (away from you) f) the film will come off the reel at the top and toward the takeup reel
  3. If no leader, add one.
  4. Check to make sure the leader is long enough: a) 8mm film - 2 feet b) 16mm film - 3 feet
  5. Trim end of 8mm leader if needed - no sharp corners on the edges at the end

Film Is Not On The Reel Correctly - Fixes

Problem: The film head is okay (top of frame is nearest the leader or start of film), but the non-emulsion side is up.

Solution: Mount the reel as per normal except that the leader will be coming off the bottom of the reel.  Take the leader and feed it to the top of the take-up reel.  Then wind the film as normal and rewind as normal.

Problem: The film is backwards on the reel.  The bottom of the frame is nearest the leader (or start of film).

Solution: Wind the film from the original reel to the take-up reel and DO NOT REWIND.  Take the take-up reel and mount it on the projector.  After scanning the film, remove the take-up reel and replace it wit the original reel.  Now rewind the film onto the original reel.

Clean Film

Clean the films on the rewinders using the Solvon film cleaner (in the little brown glass Edwal film cleaner bottles):

  1. Mount the customers reel on the right rewinder and the takeup reel on the left
  2. Thread the film from top to top of the reels
  3. Grab a film cleaning cloth and the Solvon
  4. Open the Solvon, put the cloth on the opening and tip the can until you feel the liquid on the cloth
  5. Close the Solvon cap ASAP
  6. Where the liquid is on the cloth, pinch the film in the cloth near the left winder
  7. Holding the winder handle, slide the cloth to the right reel
  8. keep the cloth pinching the film near the right reel and wind the film onto the left reel
  9. wind film onto takeup reel
  10. Switch the reels from one winder shaft to the other, keeping the reels in the same orientation
  11. Now thread the right reel to the left reel (customer reel), this time the film should go from the bottom to the bottom of the reels
  12. If the film appeared really dirty on the first pass I sometimes will re-clean the film when rewinding the film back onto the customer's reel

Tips

  • Make sure that the cap on the Solvon is closed ASAP because the Solvon evaporates quickly.
  • On large reels I sometimes stop the rewind and check the cloth to see how dirty the film is.  If dirty I switch to a clean location and put more Solvon on the cloth.

Scanning Film

  1. Place machine in "stop" (16mm) or "rewind" (8mm)
  2. Clean machine a) For 8mm machine

    • take cover off film track and spray both cover and track with canned air
    • wipe dust off machine with a cloth

    b) For 16mm machine

    • remove and clean film gate with canned air
    • spray canned air of film track
    • clean audio drum with rubbing alcohol
    • wipe dust off machine with a cloth
  3. Mount the reel.  For the 8mm machine you may have to place or remove the Super8 adapter on the reel axle depending on the film reel hole.
  4. Thread the machine with film a)For 8mm

    • Thread thru the top of the film track and keep feeding until the film comes out of the back end of the film track,
    • Make sure the start of the film is hooked under the film post just below the front reel.
    • Hook the film onto the take-up reel and manually wind the film around the reel a couple of times

    b) For 16mm

    • Thread the film thru the film wheels
    • Feed the film into the slot on the take-up reel and manually wind the film around the reel a couple of times
    • Make sure that there is a fingers spaces between the first wheel wheel and the film
    • Keep the finger in the loop above the first white wheel and rotate the start switch to 2 o'clock
    • Remove the finger from the loop and pull the film down a little to increase the loop below the gate
    • Move the switch to the play position
    • There should be a good loop above the gate and below the gate
  5. Run (use the "Motor" switch) the machine for a few seconds to settle in the film.
  6. For the 16mm machine, make sure the "silent or sound" toggle is set for the appropriate film.
  7. Also, make sure the switch box behind Flag's monitor is set to the correct machine.

The Software - "CineCap Velocity HD"

Start up the software on Flag captures the video feed from the scanner.

  1. Make sure that Flag has enough space on the "N" drive...should have at least 200GB or more free.
  2. Start up the software.
  3. Check the "settings" tab to make sure that everything is set correctly.  Items to check are:
    • Drive to Capture...should be N
    • Manual Sync .... generally should be unchecked.  (used to be that if the 16mm film was bigger than 1200 ft, it had to be checked and set to -5...not sure if this is the case with the new software).
    • SD progressive .... only check if planning to render to SD progressive
    • Process all film as negative ..... check if needed
    • Lossless High Def ....  generally not checked...if checked,this gains about 5% quality and 4X the file size.
    • High Def Progressive .... usually checked.
  4. Switch to the "Capture" tab and the image should be displayed from the scanner
  5. Enter the correct "Film Type" and the full "Customer" name (ie. john_smith)
  6. Usually the "Auto-name" boxed is checked....sometimes not checked if you want to override the naming.
  7. Before "Start" is pushed, the filename number is the next number...after the "Start" is pushed it changes to the next number (not the current number).  Move the cursor onto the "Start" button.
  8. Start the scanner and push the software's "Start" button before the film starts to show real images.
  9. When the film is done scanning or approaches the end of the real images
    • Click the software's "Stop" button.
    • Then click the "keep" button.
    • Make sure the film has cleared the film track (for 8mm this usually requires a little manual push on the take-up reel)
    • Toggle the "motor" switch to off.
  10. Rewind the film
    • Thread the end of the film into the customer's reel.
    • Wind film manually for a few turns
    • Switch the scanner to "Rewind"
    • Toggle the "Motor" switch on
    • Once the film has rewound, toggle the "Motor" switch off
  11. Remove customer's reel from scanner and put safely away.

Tips

  • Generally all toggle switches on the scanners should be up when the unit is running.

Render/Pulldown via CineCap Velocity HD

Go the "Speed Change" tab and set up the scanned film to be processed.

Rendering Flash Video Directly From Vegas

The following article is mostly copied directly from
http://www.solovj.com/rendering-flash-vide-with-vegas-pro-2

One of the weaknesses of Vegas Pro is its inability to render Adobe Flash Video files within the application itself.

FLV files are the defacto standard for web video content distribution. I discovered a way to create FLV’s via frameserving from Vegas Pro to On2’s Flix Pro.

What is frameserving?

In layman’s terms, frameserving is the ability to create a reference file within one application and have a second application render from that reference file. Web video journalism is about efficiency and speed. The major post production suites are anything but that from my perspective, whereas Vegas is built for both speed and efficiency.

There are three components to render FLVs from Vegas Pro.

The first is Vegas Pro of course. Second, you need to download Satish’s DeBug Frameserver plugin and install it. The third component is obtaining an application that can render FLV's.  We currently use Adobe CS3's Flash Video Encoder.

The great thing about Vegas Pro is that you can change the properties of the project to reflect the end file dimensions you want to post online (I typically create either a 640×360 or 480×270 square pixel aspect ratio). The other caveat is you need to make sure your audio properties are 44khz 16 bit. Trying to frameserve to 48khz throws an error message and it took asking on the Vegas forums to resolve this virtually unknown glitch. With that established, the process is straight forward for using the frameserver plugin within Vegas Pro.

Once you have edited your timeline and are ready to encode, go to File->Render As-> select from the “Save As Type” menu DeBugMode Frameserver (*.avi).
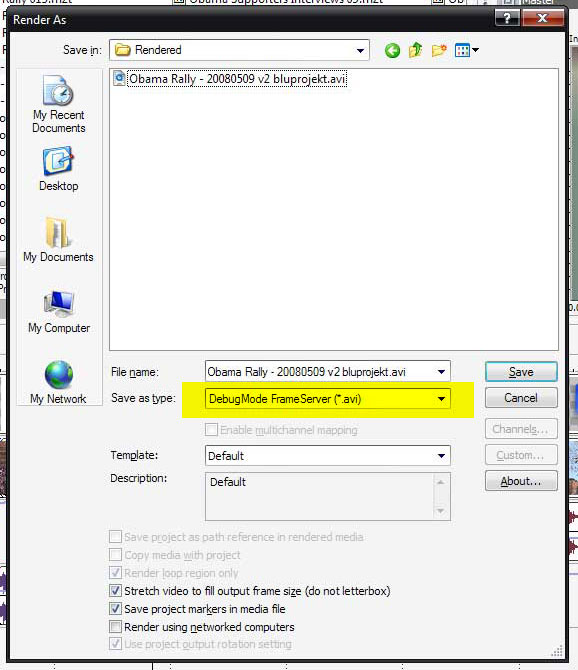
vp8_flv_tutorial1

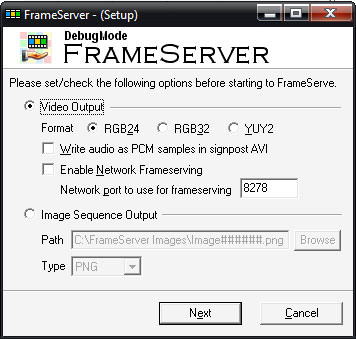
You will be prompted with small window to select various options. I elect to use RGB24 as my video output option.
vp8_flv_tutorial2

Select next, and the frameserver will render a signpost avi file - this is what will be used by your flash encoder to render the FLV. Minimize Vegas and start Adobe's Flash Video Encoder.

Select your input file in the first window and select an option for the name of your output file if needed.  Typically we use the default settings, but you can modify them if you want to.

At this point, Vegas will serve the timeline via the DeBugMode Frameserver plugin to the Flash Video Encoder. Render time will be dependent on the length of your project. Once done, you can watch the FLV file in any player that supports the FLV format (I use Adobe’s Media Player), or just upload it to the web.

Is this as convenient as having integrated Flash Video encoding within a single application? To be honest, I think it is just as convenient, and without the bloat of the other competing NLE applications available. I have successfully used this workflow and it’s faster than Premiere Pro’s integrated Flash video encoding. It may not have all the glitz of advanced features available in other applications, but it gets the job done - and does so with better efficiency - a hallmark trait of Vegas Pro 8 that I have espoused for the solo video journalist paradigm.