Processes & Proced...

16mm Film Audio Transfer

Overview Currently we are transferring 16mm film using the Retro-16 Pro to scan the film and the Sniper-16 HD to scan the optical audio.  After scanning, I drop the Retro16 footage on the Vegas timeline and the Sniper footage with audio on the Vegas timeline below.  The audio will be sync'ed up with the footage from the Sniper...now we need to sync the audio to the footage from the Retro.  The Sniper footage can be a big help, as you can line up the frames between the Sniper and Retro footage.

Notes:

The audio track should be the "master" and you should not really change the audio track speed or length, etc.  Change the Retro footage....much simpler.

Sync Procedure

  1. Drop footage from both Retro and Sniper onto the timeline.  The Sniper will automatically include the audio track.
  2. Find the middle of the footage and mark it...preferably at a scene change.
  3. Go to the end and check the footage sync....mark scene changes
  4. Go to the start and find a scene change and mark it
  5. If the scenes are in sync, your done....if not continue
  6. I went through the timeline and marked the Retro and Sniper video scene selections.
    1. I used "sync" for the Sniper and "SYNC" for the Retro.
    2. I also made a note in the Retro mark of the distance between the marks.
  7. In my example I found the last 60% of the footage was in sync and the first 40% was not
    1. The 40% not in sync was about 27 seconds out at the start and the gap between the outage narrowed to 0 seconds by the time we were 40% into the footage.  To bad there is no graduated stretch.
    2. I basically cut up the 40% into scenes and stretched each scene...this meant each scene would be a decreasing stretch, in my case, as we approached the 40% mark.
    3. I started by finding the first scene change and splitting it.
    4. Then I moved the scene so the start lined up with the Sniper footage.
    5. Then I stretched the footage on the right until the footage lined up with the end of the Sniper scene.
    6. Then I checked to make sure the audio was in sync for this scene.
    7. I continued this cut, line-up, stretch until the 40% footage was done.
    8. Then I checked to make sure the audio was in sync for the entire footage.

Sticky Tape Syndrome

Overview Tapes we are talking about can be video tapes or audio tapes....they are all basically the same type of construction.  Tapes can absorb moisture over time and the surface can become sticky.  This sticky tape syndrome will prevent the tape form being transferred as the tape will gum up the heads on the reading machine.

What Causes This To Happen 

  • Storing the tapes in a very humid environment....like the tropics
  • Some audio tapes have been known to be more likely to break down over time

Solution

Tape baking is a common practice to remove the moisture.  We have a Excalibur Dehydrator that we use to bake the tape.

Bake the tape at 120 degrees F for 4 to 8 hours.  TESTED.

Test

Tape:  BC Lib tape 2008-058 tape #1 on May 2, 2015

Came across a reel-to-reel tape that squeaked a lot in the middle of the tape and also left reside/dust below the machine and in the path.  The tape's digital file was good at the start and end but muffled and screechy in the middle.  The tape physically appeared different looking at it from the side of the reel....the first 1/4 inch of tape looked different (lighter in colour) than the rest of the tape.

Baked the tape at 130 F in the dehydrator for about 5 hours.  Let the tape acclimatize hanging on the reel-to-reel deck for about 20-30 minutes.  Ran the tape...no squealing and the digital file was perfect!!

U-Matic (20 minute tape) tape on May 20, 2015

Ran the tape and captured the audio and some of the video later on in the tape.  The tape had 2 musical numbers on it and only the second number sort of captured....the first one only the audio and the video was major snow!  Ran a test tape with bars and found the same snow and okay audio capture.  Cleaned the heads (several times...until no dirt appeared) and re-ran test tape...bars and audio good!

Baked the tape at 125 F in the dehydrator for 8-9 hours (in at 8am out at 5pm?).

Sample of Before and After

Before:

[audio mp3="http://www.lifetimeheritagefilms.com/knowledgebase/wp-content/uploads/2015/02/sticky-shed-sample-bad.mp3"][/audio]

After - (fixed via baking):

Reference:

http://en.wikipedia.org/wiki/Sticky-shed_syndrome

The link below describes baking U-Matic tapes:

https://blogs.library.duke.edu/bitstreams/2014/04/09/digitization-details-bringing-duke-living-history-into-your-future/

Mounting Reel-to-Reel Tape

Overview Reel-to-reel tapes should be mounted on the left spindle with the tape coming off the reel on the left hand side.  The tape has a glossy side and a dull side.  The glossy side should be facing out on the reel and the dull side should be coming down and against the heads.  Sometimes the leader will have a strip pattern...this should be facing out.

Issues

Tape Sounds Muffled

The tape will sound muffled if the tape has been digitized from the back side!  The tape has a glossy side and a dull side.  The glossy side should be facing out on the reel and the dull side should be coming down and against the heads.

RetroScan process

From the Retro machines the film processing migrates along in the system to various folders. This is the process:

  • RetroScan scans the film and the raw file is created in the RetroScan  Albums under the Q: drive of Thor; the raw file is a .film file.
  • these files from the RetroScan are then "exported" as jpg files into the RetroScanExports folder on the S: drive of Thor
  • from Vegas the timeline is produced and edited; from here the exported file (the jpg's) is imported and then "rendered out" as (typically) an AVI, and/or MXF, and/or MP4 file depending on the customer use, and placed in the Renders folder on the S: drive and may then be moved elsewhere on the system if needed for editing (ie. sound editing) and or DVD authoring. The Vegas "veg" file is stored in the RetroAlbum folder (Q:drive) with the name of the client, the folder is named with the client name and is preceded by the date created.


Fonts - master group for LHF

We store a master group of fonts in the folder: U:\User Data\All Users\Fonts

This has all the fonts that we've come across over the years.

In order to update the fonts of a PC:

1) Open control panel

2) Select the Fonts icon

3) Go to the master fonts folder, select all fonts, copy, and paste into the Fonts window opened in the previous step.

NOTE:  Some fonts will not copy...so monitor the copy so that you can answer the prompts (otherwise it will stop and not finish until you do).

Film Audio Transfer - Super8, 8mm

Purpose & Overview This describes the procedure to transfer audio from Super8 sound film and from 8mm sound film.  The general process is to run the film through a projector that can read the audio track and transfer the audio to the computer.  Once on the computer the audio can then be merged with the video.

Overview Connections

Projector (currently the Elmo) connects to the Echo Layla box via a 3.5 stereo cable should be plugged into the rear of the Layla box in position "line input" 7.  Layla box plugs into Layla PCI card in Audio Capture system/computer.

8mm Equipment Required

8mm/Super8 sound projector. Eumig Mark S 710D. Now using the Elmo Projector.

  • power transformer for 120v 60Hz to 220v 50Hz conversion.

Super8 take up reel.  Sankyo reel is a good one (not with the Elmo).

Echo Layla box.

The XP PC called "Music" to record the audio onto.

3.5mm stereo male to 5 pin DIN cable to connect the PC (via the Echo Layla) to the projector.  This cable could replace the one that is plugged into the Echo Layla box.

Super8 Equipment Required

Super8 sound projector. Yashica Sound P820. Now using the ELMO.

Super8 take up reel.

Echo Layla box.

The XP PC called "Music" to record the audio onto.

3.5mm stereo male to male cable cable that should be already connected to the Echo Layla and should be plugged into the projector's "monitor out" jack.

Summary

Play the  sound film through the  sound projector and record the output audio onto the PC.  In post the audio files are merged with the video that was transferred using the Retro units.

8mm Steps

  1. Set up the Eumig projector near the Echo Layla box in the recroom.
  2. Mount the take up reel on the projector
  3. Connect "Music" to the projector using the 5 pin DIN to 3.5mm stereo cable.  There will be a 3.5mm cable already plugged into the Echo Layla box....replace this cable wit the 3.5mm to 5 pin DIN cable.  The 3.5 stereo plug should be plugged into the female 3.5mm/1/4" adaptor plugged into the Layla and the 5 pin DIN plug should be plugged into the DIN socket labeled with a "play" symbol (side of the projector with the knobs and switches, nearest the front of the lens).
  4. Open Sony Vegas on Music and create a new audio track.  There should be a 2 track sample in the RAW folder.
  5. Make sure the audio input is set to line-in..... a) Record input: "Line-in VIA High Definition Au (Default)" b) .... this is set  under options / preferences / audio device (tab) / Default audio recording device (field) c) If this is not set correctly on the track info, then you may have to change it under the preferences and you may have to delete and recreate the audio track to set it correctly. d) If you are not getting the audio...you may have to check the settings in VIA HD Audio Deck (found in icon tray) to make sure that the "line-in" is set correctly.
  6. Mount the film on the projector's long arm.
  7. Clockwise rotate the projector's run switch to the first position (load).
  8. Just below the lens is a black "push-switch"....push this and hold it.
  9. Feed the film into the front slot above the lens.  Once it catches it should start feeding through the film pathway.  Watch the film and make sure it does not jam or bunch up in the pathway.  IMMEDIATELY turn knob to OFF if jam occurs and then rewind the film.
  10. When the film reaches the take-up reel it may catch nicely or you may have to stop the film and manually make it catch.  You can also let go of the "push-switch" once the film appears at the back of the projector.
  11. Make sure the projector's volume control knob labelled with a Nike swoosh is set around 10:30 o'clock (you may want to test this setting).
  12. Test if Vegas is getting the audio by.... a) creating an audio track b) clicking the "arm for record" (in the track header info) and setting up where to record c) running the projector and watching for the audio bars in Vegas to react
  13. Once your satisfied with the audio levels in Vegas.... a) Rewind projector to start b) click the "record" button in Vegas c) start the projector
  14. Clockwise rotate the run knob to either position to run the film.
  15. When the film is done, hit the "stop" on Sony Vegas, and rotate the projector's run knob to the "off" position.
  16. Thread the film back into the original reel and rotate the run knob to reverse (first position - counter clockwise).
  17. Repeat the above for all the films.  It helps if the audio file numbering matches the film video numbering.
  18. Match up the audio to the video.

Super8 Steps

  1. Set up the projector near the Echo Layla box in the recroom.
  2. Remove ELMO cover off the projector (pull straight out) so that one can see the film's path
  3. Mount the take up reel on the projector
  4. Connect "Music" to the projector using the 3.5mm male-male stereo cable.  The 3.5 stereo plug should already be plugged into the Echo Layla that in turn is connected to "Music".  The other end of the 3.5mm plug cable should be plugged into the "MONITOR-OUT" jack at the back of the projector.
  5. Open Sony Vegas on Music and create a new audio track.  There should be a 1 track TEMPLATE in the F:/RAW folder.
  6. Make sure the audio input is plugged  into the MONITOR OUT jack..... a) Record input: "Line-in VIA High Definition Au (Default)" b) .... this is set  under options / preferences / audio device (tab) / Default audio recording device (field) c) If this is not set correctly on the track info, then you may have to change it under the preferences and you may have to delete and recreate the audio track to set it correctly. d) If you are not getting the audio...you may have to check the settings in VIA HD Audio Deck (found in icon tray) to make sure that the "line-in" is set correctly.
  7. Mount the film on the projector's long arm.
  8. Make sure the projector control labelled "volume" is set around 12 o'clock.
  9. Clockwise rotate the projector's run switch to the last position to the right as this includes audio capture.
  10. Just above the lens is a green "PUSH" button on top....push and hold this (it will not stay down).
  11. Feed the film into the green front slot.  Once it catches it should start feeding through the film pathway.  Watch the film and make sure it does not jam or bunch up in the pathway.  IMMEDIATELY turn knob to OFF if jam occurs and then turn the knob left to rewind the film.
  12. When the film reaches the take-up reel it may catch nicely or you may have to stop the film and manually make it catch.
  13. Test if Vegas is getting the audio by.... a) creating an audio track b) clicking the "arm for record" (in the track header info) and setting up where to record c) running the projector and watching for the audio bars in Vegas to react
  14. Once your satisfied with the audio levels in Vegas.... a) Rewind projector to start b) click the "record" button in Vegas c) start the projector (all the way to the right (clockwise))
  15. Clockwise rotate the run knob to the furthest point (play audio).
  16. When the film is done, hit the "stop" on Sony Vegas, and rotate the projector's run knob to the "off" position.
  17. Thread the film back into the original reel and rotate the run knob to reverse (first position - counter clockwise). Or just take the reel off and use the manual winders.
  18. Repeat the above for all the films.  It helps if the audio file numbering matches the film video numbering.
  19. Match up the audio to the video.

Editing And Syncing Audio - Super8

Assume that when the audio is captured via the projector, the projector is run at the right speed for that particular film and therefore the audio should be correct and not require much if any adjusting.  The adjusting should be done to the video.  You'll find that the video and audio will never match at first.

If the audio requires adjusting then it will need to be adjusted by doing a time stretch:

  • right click the audio track and select the properties.
  • "Audio Event" tab should open.
  • Under the "Time Stretch / pitch shift" update the Method: drop down to "Classic"
  • Check the Pitch change: Lock to stretch box and fill in the ratio with:
    • 1.45 in the Super8 film is 18fps
    • 5.00 if the Super8 film is 24fps (the projector is run at 18fps)

Sometimes the ratio may need to be adjusted a little to fit perfectly.  One can also stretch the video a little to fit too (in addition to setting the ratio first).

Issue Existing With 8mm Audio

We still have a hum in the audio.  I tried moving the "disc"s around and optimized the hum but did not eliminate it.  The projector's power plug has been altered and the Euro plug replaced with a two prong America plug.  This plugs in the transformer.  The original plug had a ground and I thought this may be an issue for the hum and Peter Knight told me that a ground would NOT change the hum.

============================================================================================

Elmo Sound ST-800 Super8 Projector with Audio

Purpose & Overview

This describes the procedure to transfer audio from Super8 sound film and from 8mm sound film.  The general process is to run the film through a projector that can read the audio track and transfer the audio to the computer.  Once on the computer the audio can then be merged with the video via Sony Vegas.

Overview Connections

Projector connects to the Echo Layla box via a 3.5 stereo cable that should be plugged into the rear of the Layla box in position "line input" 7 (top position).  Layla box plugs into Layla PCI card in Music (audio station).

8mm Equipment Required

8mm/Super8 sound projector. Elmo Sound ST-800

Super8 take up reel.  An 800' Elmo reel is included in the Elmo kit.

Echo Layla box.

The PC called "Music" to record the audio.

3.5mm stereo male to 5 pin DIN cable to connect the PC (via the Echo Layla) to the projector.  This cable could replace the one that is plugged into the Echo Layla box.

Super8 Equipment Required

Super8 sound projector. Elmo Sound ST-800.

Super8 take up reel.  An 800' Elmo reel is included in the Elmo kit.

Echo Layla box.

The PC called "Music" to record the audio onto.

NOTE:

3.5mm stereo male to male cable cable that should be already connected to the Echo Layla and should be plugged into the projector's Monitor jack!! Note: this is completely opposite from the Yashica Sound P820 used previously. The Aux Out jack will NOT produce the sound from the film's audio track!! Also NOTE: When the cable is not plugged into either the Aux Out or the Monitor Out you will be able to hear the audio from the projector's on board speaker.

Summary

Play the  sound film through the  sound projector and record the output audio onto the PC.  In post the audio files are merged with the video that was transferred using the Retro units.

8mm Steps

  1. Set up the Eumig projector near the Echo Layla box .
  2. Mount the take up reel on the projector
  3. Connect "Music" to the projector using the 5 pin DIN to 3.5mm stereo cable.  There will be a 3.5mm cable already plugged into the Echo Layla box....replace this cable wit the 3.5mm to 5 pin DIN cable.  The 3.5 stereo plug should be plugged into the female 3.5mm/1/4" adaptor plugged into the Layla and the 5 pin DIN plug should be plugged into the DIN socket labeled with a "play" symbol (side of the projector with the knobs and switches, nearest the front of the lens).
  4. Open Sony Vegas on Music and create a new audio track.  There should be a 2 track sample in the RAW folder.
  5. Make sure the audio input is set to line-in..... a) Record input: "Line-in VIA High Definition Au (Default)" b) .... this is set  under options / preferences / audio device (tab) / Default audio recording device (field) c) If this is not set correctly on the track info, then you may have to change it under the preferences and you may have to delete and recreate the audio track to set it correctly. d) If you are not getting the audio...you may have to check the settings in VIA HD Audio Deck (found in icon tray) to make sure that the "line-in" is set correctly.
  6. Mount the film on the projector's long arm.
  7. Clockwise rotate the projector's run switch to the first position (load).
  8. Just below the lens is a black "push-switch"....push this and hold it.
  9. Feed the film into the front slot above the lens.  Once it catches it should start feeding through the film pathway.  Watch the film and make sure it does not jam or bunch up in the pathway.  IMMEDIATELY turn knob to OFF if jam occurs and then rewind the film.
  10. When the film reaches the take-up reel it may catch nicely or you may have to stop the film and manually make it catch.  You can also let go of the "push-switch" once the film appears at the back of the projector.
  11. Make sure the projector's volume control knob labelled with a Nike swoosh is set around 10:30 o'clock (you may want to test this setting).
  12. Test if Vegas is getting the audio by.... a) creating an audio track b) clicking the "arm for record" (in the track header info) and setting up where to record c) running the projector and watching for the audio bars in Vegas to react
  13. Once your satisfied with the audio levels in Vegas.... a) Rewind projector to start b) click the "record" button in Vegas c) start the projector
  14. Clockwise rotate the run knob to either position to run the film.
  15. When the film is done, hit the "stop" on Sony Vegas, and rotate the projector's run knob to the "off" position.
  16. Thread the film back into the original reel and rotate the run knob to reverse (first position - counter clockwise).
  17. Repeat the above for all the films.  It helps if the audio file numbering matches the film video numbering.
  18. Match up the audio to the video.

Super8 Steps

  1. Set up the projector near the Echo Layla box at the Audio Computer Station.
  2. Removal of the Elmo  cover from the projector (pull straight out) exposes the film's path to ensure that it does not get jammed along the way
  3. Mount the take up reel on the projector
  4. Connect the "Audio Computer" to the projector using the 3.5mm male-male stereo cable from the Layla.  The 3.5 stereo plug should already be plugged into the Echo Layla that in turn is connected to the "Audio Computer".  The other end of the 3.5mm plug cable should be plugged into the "MONITOR OUT" jack at the rear of the projector.
  5. Open Sony Vegas 10 on Audio Computer that creates the audio track.  There should be a single track sample generated in the RAW folder created for that specific client.
  6. Make sure the audio input is set to line-in..... a) Record input: "Line-in VIA High Definition Au (Default)" b) .... this is set  under options / preferences / audio device (tab) / Default audio recording device (field) c) If this is not set correctly on the track info, then you may have to change it under the preferences and you may have to delete and recreate the audio track to set it correctly. d) If you are not getting the audio...you may have to check the settings in VIA HD Audio Deck (found in icon tray) to make sure that the "line-in" is set correctly.
  7. Mount the film on the projector's long arm.
  8. Make sure the projector control labelled "volume" is set around 12 o'clock.
  9. Clockwise rotate the projector's run switch to the third position (run with audio).
  10. Just above the lens is a green "PUSH" button....press this once while threading the film, or until the film appears at the take-up reel.
  11. Feed the film into the front slot on the green thing.  Once it catches it should start feeding through the film pathway.  Watch the film and make sure it does not jam or bunch up in the pathway.  IMMEDIATELY turn knob to OFF if jam occurs and then rewind the film. If it does not come back out while attempting to rewind you may need to manually release the film from the thread path to start again.
  12. When the film reaches the take-up reel it may catch nicely or you may have to stop the film and manually make it catch (the reel should take up the film while rotating clockwise, ie. the film is taken up from the rear of the reel).
  13. Test if Vegas is getting the audio by.... a) creating an audio track b) clicking the "arm for record" (in the track header info) and setting up where the file is to record to c) running the projector and watching for the audio bars in Vegas to react
  14. Once your satisfied wit the audio levels in Vegas.... a) Rewind projector to start b) click the "record" button in Vegas c) start the projector
  15. Clockwise rotate the run knob to the furthest point (play audio).
  16. When the film is done, hit the "stop" on Sony Vegas, and rotate the projector's run knob to the "off" position.
  17. Thread the film back into the original reel and rotate the run knob to reverse (first position - counter clockwise).
  18. Repeat the above for all the films.  It helps if the audio file numbering matches the film video numbering.
  19. Match up the audio to the video in Vegas (not the City, the program).

Editing And Syncing Audio - Super8

Assume that when the audio is captured via the projector, the projector is run at the right speed for that particular film and therefore the audio should be correct and not require much if any adjusting.  The adjusting should be done to the video.  You'll find that the video and audio will never match at first.

If the audio requires adjusting then it will need to be adjusted by doing a time stretch:

  • right click the audio track and select the properties.
  • "Audio Event" tab should open.
  • Under the "Time Stretch / pitch shift" update the Method: drop down to "Classic"
  • Check the Pitch change: Lock to stretch box and fill in the ratio with:
    • 1.45 in the Super8 film is 18fps
    • 5.00 if the Super8 film is 24fps (the projector is run at 18fps)

Sometimes the ratio may need to be adjusted a little to fit perfectly.  One can also stretch the video a little to fit too (in addition to setting the ratio first).

Issue Existing With 8mm Audio

We still have a hum in the audio.  I tried moving the "disc"s around and optimized the hum but did not eliminate it.  The projector's power plug has been altered and the Euro plug replaced with a two prong America plug.  This plugs in the transformer.  The original plug had a ground and I thought this may be an issue for the hum and Peter Knight told me that a ground would NOT change the hum.

Create Chapter Marks For DVD Architect

Overview Sometimes we generate files for DVD Architect to author a DVD and we forget to create the chapter marks for generating scene selection menu in DVD Architect.  Normally one would create the chapter marks in Sony Vegas and render the files for DVD Architect.  In this case we used Vegas to render files for 68 DVD's and then realized we wanted a scene selection every 15 minutes.  The problem is we never created the markers in Vegas necessary for creating the chapters in DVD Architect that are needed to create the scene selections.

Options

  1. Manually create the markers in DVD Architect!
  2. Create the markers in Vegas and re-render the files!
  3. PREFERRED: Use Ultimate-S to generate the marker files for DVD Architect.

Preferred Solution

Use Ultimate-S to generate the marker files for DVD Architect.

ultimateS-DVD

  • Find the longest video file of the bunch....in our case that was a 2:03 (h:mm) video.
  • Open Vegas and load video onto the timeline.
  • Go to Ultimate S and select the Markers tab.
  • Create markers named "Chapter nn" where nn is the sequence.  We created a chapter every 15 minutes.
  • Then select the DVD tab of Ultimate S (image above).
  • Select "Create the DVD Architect chapter file" (see highlighted line above).
  • Enter the name of the "sfl" file for the video file you want.  For example, film1.mpg should be film1.mpg.sfl
  • Replace the .....mpg.sfl files
  • Now load the mpg files into DVD Architect and the chapters should be loaded too.

You only need to load the longest video file in Vegas as if the video file is shorter and we create a sfl file for it, DVD Architect will simply stop at the end of the video file and drop the remaining chapters.


Website Roksprocket Mosaic Services Process

Mosaic process: C-A-M  (CAM is the process used for publishing on Joomla)

C- first there has to be a category (stay away from K2!!!) For each of Film, Video, Photo, and Audio I created a root category for each.

A- then there has to be an article; this article will be blank, more a placeholder than anything else, but because we want to be able to  switch between all mosaics this article will need to show the shortcode buttons for each respective Service category: Film, Video, Photo, Audio. This makes these mosaics all look alike and interact with each other.

M- then the Menu creation will tie everything together, uniting the article with the menu, the menu is the driving force whereby calling any other module on the page; ie. the header, everything else that goes on all pages, including the specific mosaic. The menu type is single article. Each mosaic will only be assigned to it's menu page; otherwise there will be a rocksproket error on the pages it is not meant for.

-The details tab must be finished first and then saved before moving on to the Modules Assignment tab, otherwise the correct menu page for the modules to be assigned will not show up when following through and clicking on their link in the list of various modules need for that page. If you link specific modules to other pages as well, an error will result on those pages that module is not intended for, these pages will need to be unlinked within in module manager; as an error page will show up and will try to direct you back to the Control Panel.

-So again, remember to associate the menu location and Parent (menu) Item, and then SAVE before moving on to the modules.

-in Page Display tab; DO NOT  Show Page Heading! It will already be in the headerbar, and so is not needed.


Retro Scan Of Negative Film

Overview NEGATIVE or POSITIVE colour film should be scanned as is; this means use the Negative button on the scan window when it is Negative Colour. When the film is Positive Colour film use Positive. The film needs to be scanned on the bright side...not dark! This means the Gamma will be pumped up.

B&W negative film should ALWAYS be scanned using the normal setting (this means POSITIVE... as there is nothing on Retro scan panel that says "normal") and NOT scanned with the NEGATIVE button SELECTED on the scan window.

Scanning B&W Negative AS POSITIVE will result in the need to "invert" the film once on the vegas timeline.

How to:

1) Run the scan using the "normal" settings:

Set the exposure dial to noon. Set the gamma to around +15. 2) Or another way is to use the Negative setting on the capture page of the RetroScan software (this setting is optimized for colour negative...not B&W negative) .

Set the exposure dial to noon (I tried 1 or 1:30pm but the scan stopped after 50 feet...probably too bright). Click the Negative setting Set the gamma -35

UPDATE (Sep 29, 2016): Scanned a color negative film experimenting Gamma settings. Other settings: Stab on, Exp 12, sensor 2; AND Gamma at three different settings: 15, 0, -15. It turns out that Gamma 0 was the best result.

Edit:

Use the "sony Invert" FX to flip the negative to positive. (Not required if run using Negative setting).

Then use the Levels FX to adjust the brightness.

Then the color corrector FX to adjust the colour.

WAV File Too Big For Vegas or Windows

Overview WAV files are supposed to be less than 2GB.  Vegas and many other Windows programs (Audicity, Ultimate Video Convertor, Magix, ACDSee Convertor, etc) follow the convention and cannot read WAV files that are bigger than 2GB.

Senerio

I just finished downloading two DVCAM tapes that were 3 hours in length.   Machina generated a AVI and WAV file for each video.  The 3 hour WAV file was just over 4GB in size and Vegas could not import it.  Vegas gave an error when importing it and dropped a few second long audio clip on the timeline!  I posted to creativecow and got help.

eac3go

The program eac3to converted the wav file to a w64 (64bit wav) that could be ingested into Vegas.

eac3go.exe is located in the eac3to folder on Apollo's C drive.  The program is a command line program that has many additional options that are enter in the command line.

Steps

1)  <win>R (cmd run)  ... this should open a command prompt

2)  cd \ to get to root directory

3)  cd <directory>  .... to get to the directory where the WAV file is located...and the subsequent W64 will be located.

4)  enter the cmd:   c:\eac3to\eac3to <filename>.wav  <filename>.w64  ....where filename is the name of the file (easiest if no blanks in name)

5)  the program took less than 4 minutes to process a 4GB WAV file.

References:

Lots of details on how to use the options can be found here:

http://en.wikibooks.org/wiki/Eac3to/How_to_Use

Trouble Rendering VelocityHD File With Vegas

Overview Every now and then we'll start rendering a project and one of the VelocityHD generated files will crash Vegas.

Best Solution:

Go to the capture system, Flag, and render the VelocityHD processed file using Vegas 9.0 and the AVI BM render template.  The render will say that it is doing no changes or whatever, and the resulting file should be the same, but the render of the project should now work using the new file.

How to Clean Old Vinyl Records

How to Clean Old Vinyl Records

Cleaning vinyl records will keep them sounding great for a very long time. But you need to know how to clean your records properly or you could damage your albums. Don't worry, it's easy to clean vinyl records.

First thing to know about cleaning vinyl records is that playing a dirty record will damage the vinyl and negatively affect the sound quality. So keep those records clean.

The next thing to know about how to clean vinyl records is that there are all sorts of ways to clean albums and all of them are imperfect.

The best advice on cleaning records is this : Play it safe. Be conservative. For better results - spend accordingly.

Even though there is no method that will truly "purify" a record, there are plenty of ways to remove dirt and get better sound.

Here are some tips on how to clean records properly as well as a list of vinyl record cleaners and products to help you with your cleaning.

Vinyl Record Cleaning Tips Introduction to Vinyl Record Cleaning The Best Way to Clean a Vinyl Record How to Clean Records with Soap and Water Vinyl Record Storage Tips Vinyl Record Cleaning Products

Return to Vinyl Record Fair Home Page

Vinyl Record Cleaning Quick Tips


These quick tips on cleaning vinyl records will help guide you through the mysterious and often misleading world of vinyl record cleaning. If you are new to vinyl records and not sure how to clean vinyl records, this list of cleaning tips is an excellent place to start.

  • Cleaning a record with a carbon fibre brush before and after play is the best way to keep your records clean and sounding great.
  • Don't take any unnessary risks. Play it safe.
  • If you are looking for the ultimate heights in acoustic clarity, buy a professional record cleaning system.
  • There is no way to truly "purify" a record and return it to some sort of virgin state.
  • Use distilled and de-ionized water.
  • Always remove surface debris and dust before any deep clean.
  • A carbon fibre brush is only meant to brush gently over the surface. They are not meant to enter the grooves of the record.
  • A good vinyl record vacuum cleaner is the best way to clean a record.
  • Record cleaning kits available at your local record store do an excellent job and cost under $100.
  • No amount of cleaning will repair a damaged record.
  • New records are not necessarily clean records. Clean your records before the first play.
  • Less friction is better. Be gentle with your albums.
  • If you are going to use a cloth from home, make sure that it is lint free.
  • A turntable or stylus in bad shape will damage your record.
  • Almost every cleaning solution leaves a residue. Even alcohols contain a small amount of grease.
  • Don't use rubbing alcohol to clean a vinyl record. It takes away the shine. It also will damage 78's.

Keep reading for more information on how to clean vinyl records.

Vinyl Record Cleaning for Beginners


Simple, Safe and Cheap Record CleaningThe art of cleaning vinyl records tends to lend itself to wide-spread speculation. There is almost a pseudo-science associated with it.

This happens when curating any fine object with delicate features where cleaning can enhance its qualities and increase its value.

We've all heard about the strange miracle treatments for shiny shiny hair or silky silky skin. Vinyl record cleaning methods are no different.

There are a plethora of vinyl record cleaning tricks out there. Some record cleaning tricks don't do anything. Most are more work than they are worth. Some will flat out damage your records.

The best approach to cleaning and caring for vinyl records is to take a conservative approach. You'll find that the most effective methods don't require fancy tricks or expensive solutions.

Play it safe. Your vinyl records will shine and sound like new for years.

PS. Don't wash your hair in coconut milk. It'll make your hair greasy for weeks.

How to Handle your Vinyl Records

The best way to clean a vinyl record is to make sure your record doesn't get so darn dirty in the first place.

So rule number one is to keep your filthy paws off the sensitive parts.

Your fingers contain acids and oils that will wear away at the vinyl - chemically.

So however you avoid touching the playing surface of the record is fine.

There isn't really a proper way to hold a vinyl record. Just like there isn't a proper way to drink wine. There are only consequences... like hangovers.

Just take it easy and use two hands. Two hands to hold on to a record. You only need one hand to drink wine... unless you're in church.

But it's simple. Hold the vinyl record by the places that don't hold information and it may help keep the record in better shape over time. That's all there is to it.

Preparing a Vinyl Record for Play

In an ideal world, it is the best practice to clean a vinyl record before and after play to prevent the build up of dust and grime.

A carbon fibre brush passed lightly along the playing surface will do the trick.

If you do not have a carbon fiber brush, try to find a cloth for cleaning glasses or cell phone screens. You know the ones I'm talking about.

Pass the cloth gently over the surface of the vinyl record in a circular motion along the grooves.

Be gentle. We don't want to push dirt into the grooves or drag particles across the surface of the album.

This is simply to brush off loose particles.

For a deeper clean, use the simple, safe and cheap vinyl record cleaning method described below or use a record cleaning kit from your local record store.

Cleaning New Records

Even brand new records should be cleaned before their first trip around the turntable.

New records come coated in a mold release compound that should be cleaned off if you wish to achieve the highest quality of sound from your vinyl record.

Damaged Vinyl Records

Sometimes all the cleaning in the world won't return a vinyl record to its former glory. Unfortunately there is little you can do about it.

The good news is that a light scuff or visible scratch on your vinyl won't necessarily cause your record to skip. You'll be able to listen to your vinyl record with only minor deficiencies in sound quality.

If you can feel the scratch with your finger tips, however, than you know that it has irrepairably changed the surface of the record and it has a very good chance of skipping.

Turntables and Cartridges

Your turntables and cartridge will have an effect on the condition of your vinyl records.

The tip of the stylus should be kept clean.

The stylus is the part of the cartridge that drags across the surface of the vinyl record to create sound.

Since it is essentially cleaning out grooves in the record while it plays, there is a tendency for it go gather dust and small fibers.

Take a look at the stylus before playing a record. If it is dirty just blow off any junk gently. No spitting now.

Every stylus should be replaced at some point. The more you spend on your cartridge the longer they will last - theoretically.

Playing clean records will help too.

But respect the stylus. It is a little diamond scraping across your albums.

And since the point of contact is so small, the pressure that the little diamond is placing on your record is somewhere in the tens of thousands of pounds per square inch. Respect.

The Best Way to Clean Records and Why


Best Way to Clean VinylStraight up, the best way to clean a vinyl record/lp/album is to use a machine called a vinyl record vacuum cleaner.

While you may not be in the market for such a contraption, to understand why this device works so well will help you understand record cleaning in general and help you devise your own opinion on the serious matter of vinyl record cleansing.

Suffice to say, this is not your everyday household vacuum cleaner but one designed specifically to clean vinyl records. It costs thousands of dollars for a good one and they are infamously noisy. But this is the best way to clean a record.

You'll find machines like this at the Library of Congress, for example, where they must clean and maintain a collection of over 125,000 vinyl records. If you don't have a massive collection and/or you aren't fanatic about cleanliness, you can probably do without a vacuum machine. There are many other more affordable ways to clean your records very very well. But don't be shy, it's alright to be nuts about cleanliness. Because in the world of vinyl records, cleanliness equals acoustic clarity.

Now, whether you are using a fancy vacuum machine or you are washing your records at home with household items, the process always begins the same way. Before any deep clean, you want to remove as much of the loose dirt and debris from the surface as possible. Failure to do so may trap/wedge those particles deep in the bottom of the grooves. Not only does that make the album harder to clean, but you may also damage the record if any of those particles happen to be harder than the vinyl.

Vinyl Record Close-UpFor the most part, it is these microscopic culprits that have lodged themselves into the grooves of the record and now cause your record to click, crackle and pop when the stylus skips over them. This noise is referred to as a "conchoidal shock wave" but I like to call it "the sound of dirt."

Take a look at the picture on the right of the record's surface under a microscope and you'll see how tiny things could easily get stuck in the valleys of the album.

So yes, it's only after the surface has been cleared of particles that it is safe or sensible to try for a deeper clean. Use a proper record cleaning brush for this task (available at most record stores), but if you don't have one available, you can get away with using a very soft cloth. Just remember to be gentle... no hard rubbing.

After the surface debris has been cleared, the record is ready for the vacuum record cleaning machine.

There are several different vacuum record cleaning machine designs on the market but they all clean records in pretty much the same way - they suck.

Vacuum record cleaners suck the dirt right outta the grooves. This way, the record is cleaned using as little friction as possible. And without friction, there is no danger of dragging particles across the album or re-introducing contaminates from a soiled cloth.

Beyond sucking, these machines usually do a couple more things that help the cleaning process along. They brush and they spin.

The brush is not utilized how you might expect. Remember, the surface of the record has already been cleared of debris. And brushes, even ones meant for vinyl records, are not intended to enter the grooves of the record. The main function of the brush on a vinyl record cleaning machine is to apply a thin and even layer of cleaning fluid to dissolve oils and/or to protect the record from the vacuum. The vacuum then sucks the dirt along with the cleaning solution right off of the surface of the record leaving it dry and shiny.

Besides being a practical point of engineering, record cleaners also utilize spin to help them along. Generally speaking, spin helps provide an even clean, however, some designs use centrifugal force to dry the record. Spin is arguably the best way to dry a record because, again, it does not employ any friction.

And there you have it, vinyl record vacuum cleaners work as well as they do because they provide an even and deep cleaning without too much touching.

Any record cleaning method that follows that principle and gets the job done will receive high grades.

That said, be weary of techniques that involve a lot of contact/friction or the use of chemicals.

Simple, Safe, Cheap Record Cleaning


This is a simple, cheap and fairly safe way to clean a vinyl record. There is very little chance of damaging your albums. And, it's cheap because you can get your records clean with everyday household items.

Before you start cleaning, know this, soap and water is not the best way to clean a record for two reasons :

  • Even the best soaps leave a residue (so make due without it if possible) and;
  • It's better to minimize or avoid physical contact with the surface of the record.

But if you need to clean a record and you aren't too fussy, this will do the trick.

What you Need to Clean Vinyl Records at Home with Soap and Water

  • Dish Soap (Not the best solution but it will do if you have dirty records and little cash)
  • A Bowl
  • Warm Water (Distilled and De-Ionized if Possible)
  • A Soft Cloth - Lint Free
  • A Carbon Fibre Brush (Dry) or Cloth for Cleaning Bifocals

Clean Dust From Vinyl Record

Step 1 : Remove Dust

You should remove dust and loose particles from the surface before any deep cleaning.

A carbon fibre brush passed lightly along the playing surface will do the trick.

The brush is not intended to enter into the grooves of the record.

The carbon bristles help disperse any static charge that will cause dust particles to stick to your record.

If you do not have a carbon fiber brush, try to find a cloth for cleaning glasses or cell phone screens. You know the ones I'm talking about.

Pass the cloth over the surface of the vinyl record gently in the direction of the grooves.

Be gentle. We don't want to push dirt into the grooves or drag particles across the surface of the album.

This is simply to brush off loose particles. For a deeper clean, we'll use some good old fashion soap and water.

Step 2 : Prepare the Cleaning Solution

This is just soap and water. But try cleaning your records with just the distilled warm water. All soaps and even most alcohols will leave a residue. That's not to say that you can't use any solution other than pure water - just use it sparingly and rinse well. If you do that, a little bit of soap to help break down some of the grease won't hurt.

Put the warm water in the bowl.

The water shouldn't be too hot.

Some vinyl record collectors will suggest using very hot water. While, yes, hot water does take off dirt more readily. We all have experienced that. Heat is not good for vinyl records. Even though the melting point of poly-vinyl-chloride may be well above that of boiling water. There really isn't any reason to risk your hands or your records with extreme conditions.

The water just needs to be warm enough so that the soap can dissolve easily.

Mix in a small amount of dish soap and stir. Use as little soap as possible. In fact, try not use any at all.

Clean Dirt From Vinyl Record

Step 4 : Clean the Record

The cloth you use to clean the record should be soft and absorbant. Do not use rags or old t-shirts.

The clothes used for polishing cars work really well. They only cost a few bucks, they are reusable and they can be found in any automobile accessories department.

Wrap the cloth over your index finger and dip your finger tip into the bowl of warm lightly-soaped water.

The cloth souldn't be wet enough to leave any wetness on the record. Therefore, drying the vinyl record after cleaning should be a non-issue.

Now, gently rub your cloth-covered soapy finger over the vinyl record in a circular motion along the grooves.

Go in concentric circles clockwise from the center around the record until you reach the outside edge.

Then go in the opposite direction - counter-clockwise around the record spiraling inwards towards the label - like the stylus does.

Clean the record evenly.

Keep your finger tips flat. Do not use your nails.

Do not get the label wet. If there is some wetness on the record, just use a clean part of your cloth to gently absorb it then brush the record with your carbon fibre brush.

Step 5 : Repeat

Once your water or cloth is dirty, it's time to start again. Get a new bowl of warm soapy water and use a clean section of your cloth.

Step 6 : "Rinse"

Do one final pass using only the distilled water just to make sure there isn't any soap residue left behind.

If this doesn't work to your satisfaction or you have a large number of records to clean, use a professional record cleaning kit or record cleaning machine.

Keep in mind though, regular maintanance is the best way to keep a vinyl record collection in good shape.

Vinyl Record Storage Tips


Vinyl Record Storage PictureCleaning your vinyl records is just half the battle. Any GI Joe will tell you that "knowing" is the other half. More specifically, it is knowing how to store vinyl records properly that will win the war.

First, keep your vinyl records in a cool dry place. That's a great start.

Also, keep your records stacked vertically.

The picture on right demonstrates the proper way to stack records.

Never lay the vinyl records flat. And especially don't stack your vinyl records one on top of the other. This can cause the vinyl record to warp over time.

Do not squish the records together too tightly. Give them some breathing room.

Always use plastic sleeves intended for storing vinyl records.

Any other covering will damage your vinyl record - chemically. That includes the paper sleeves that often come with the album!

Vinyl Record Cleaning Products


If you have a lot of vinyl records to clean then you may be interested in picking up a record cleaning kit or one of the many products designed specifically to clean vinyl records.

You can check out the Georgia Straight's contest page near fair time for a chance to win a Spin Clean Kit donated by Red Cat Records in Vancouver,Canada.

Record Cleaning Kits

Record Cleaning Kits

Price Range : $50 - $200 Manufacturers : Spin Clean, Rek-O-Kut, Gruv Glide, UltraBit, Stanton, Audio-Technica If you have a lot of records to clean or just want a great cleaning job, you may be interested in purchasing an affordable vinyl record washing kit.

There are record cleaning machines that cost a fortune but these have become rather rare. Why spend thousands of dollars when you can get a great clean from one of the low-cost washing kits?

Most used record stores get by just fine with a record washing kit that costs somewhere in the 100 dollar range.

Pick these up anywhere that sells stereos and turntables. Many vinyl record stores will also carry these record washing kits.

Carbon Fiber Brush

Carbon Fiber Brush (Dry)

Price Range : $10 - $50 Manufacturers : Stanton, Audioquest, Pro-Ject, clearaudio, AcousTech, Hunt EDA Your most common record cleaning tool is the Carbon Fiber Brush. Hail to the inanimate carbon fibre brush.

It is the best way to remove dust safely from your records.

The carbon bristles help disperse any static charge that will cause dust particles to stick to your record.

They are available just about anywhere that sells turntables.

You can expect to pay about 20 dollars for a standard brush.

Use the brush like a zamboni. Gently glide the brush around the vinyl record as if the brush was the second hand and the vinyl record was a big clock.

Be gentle with the brush.

The brush is not intended to enter into the valleys of the record.

And always brush with the grooves man... with the grooves.

Reference:

http://www.vinylrecordfair.com/clean_vinyl_records.html#vinyl-record-cleaning-tips

Retro8 Troubleshooting

Focus - Frames Going In and Out Of Focus This indicates that the film is NOT flat while running over the gate.  I've noticed that sometimes the film will bounce up and down over the gate or will not lie flat while going over the gate.  When the film is bouncing, it is also running in a jerky motion.

Cause - Solution

Two issues cause this type of problem:

1)  Make sure that the source hub is NOT tight on the film reel.  It should be tighten and then just slightly loosened.  If it is tight it will cause a jerky flow of the film.

2) The film tension clip is too loose and not applying enough tension.  This clip is designed to hold the film down and apply enough tension to the film so that it will "pull" flat as it goes over the gate.  The take-up reel will pull the film along and the tension clip will apply a bit of pressure on the film so that it drags and therefore lies flat over the gate.  This clip is usually the problem.

For adjusting the tension clip....check the bottom of the instructions here:  http://moviestuff.tv/retro_8_setup.html

Missing frames

This could be due to:

  1. Found that the spring clip holding the film edge (sprocket side) down was loose.  There was in fact a 1mm gap between the film and the spring.  This caused the film to drift and the software threw away frames.
    1. SOLUTION: Remove film from Retro unit and re-tension the spring according to the instructions on the website.
  2. Broken or missing sprockets.  The current software will throw out the frames that it cannot find a sprocket for.  However, this will change as the algorithm for the sprocket id is changing with the faster units.
  3. If the "exposure" knob is set too dark or too bright and the software cannot id the sprocket as the brightest point, the frame may be skipped.

Trouble Shooting Tip

The Retro software can be put into analysis mode using the keys <ctrl><shft><alt><A>  (all at once).  You must be in the capture window and the calibration and setup buttons must be deactive.  A letter 'A' will appear in the capture window and the film will appear.  When running the film the capture window will show the  capture reticle and a green dot will show near the sprocket hole and a red dot will show on the edge of the sprocket hole.

You can be in 'A' mode and "START" and "STOP" the capture and the entire stream will b captured, including the non-captured frames.  This is great to send for analysis.

References:

http://moviestuff.tv/retro_8_setup.html

VHS Tape With Multi-track Audio!

Overview A customer dropped off a VHS tape of his wedding and mentioned that it may have two different audio tracks that can be played.

Observations

Regular looking VHS tape.  Tape started with a slide show, then the wedding and reception.  Tape is about 2 hours.  Played the tape in the Panasonic AG5210 (standard VHS VCR) and a JVC HRS5910U S-VHS vcr ...both had trouble playing the audio for the slide show and no trouble playing the audio for the rest of the tape!

Investigation

(refer to wiki article on VHS tape) VHS tapes started with a linear audio and later linear stereo audio track recorded at the upper edge of the tape.  In 1984 JVC developed a Hi-Fi stereo audio system that embedded the audio into the video recording.  To maintain compatibility with the older system the audio track was duplicated on the linear stereo audio track.  The quality of the Hi-Fi audio is second only to the CD quality.  Because there can be two stereo audio tracks, Hi-Fi and linear, there can be two different audio tracks.  It seems though that many VCR's will only play one of the tracks, either Hi-Fi or linear.

Solution

Use our Sony SVO-9500MD S-VHS Hi-Fi vcr deck.  This deck has a switch to select the audio track, labelled AUDIO (selections: Hi-Fi, Mix, Norm).  Run the tape through twice, once using Hi-Fi, and once using Norm.  Then in Vegas we can create a project with the video and the two different audio tracks.

Playing the tape on the Sony SVO-9500MD S-VHS I discovered the two audio tracks!

Amerisoft Video Converter Ultimate

Overview Sometimes we need to extract the contents of a DVD.  In this case we needed to extract clips of a DVD for a demo.

Extracting

We have two options to extract a DVD:

  1. Vegas Pro
    1. File / Import / DVD camcorder disc - then select DVD and extract.  Sometimes this fails with an error.
  2. Ultimate Video Converter
    1. Extract the DVD onto disc.  See info on program below....

Amerisoft Video Converter Ultimate

- what works

  • VOB, MPEG-2, AC-3
    • MPEG-2, 8000 kbps, AC-3

- does not work

  • AVI, MJPEG, PCM
    • MJPEG, 8000 kbps, PCM

Recording 4 Track Reel-To-Reel in Vegas

Recording a Narration in Vegas™ Pro

We spend a lot of time discussing the wonders of Vegas Pro as a nonlinear video editor—and with good reason. But as we discuss the sophisticated features the application provides for creating your video edits, we often overlook the fact that Vegas Pro is also an incredibly powerful audio workstation. The audio-related features in Vegas Pro have set the standard by which all other nonlinear editing applications are judged and no other has surpassed—or even matched—what Vegas Pro enables you to do with the audio in your video projects.

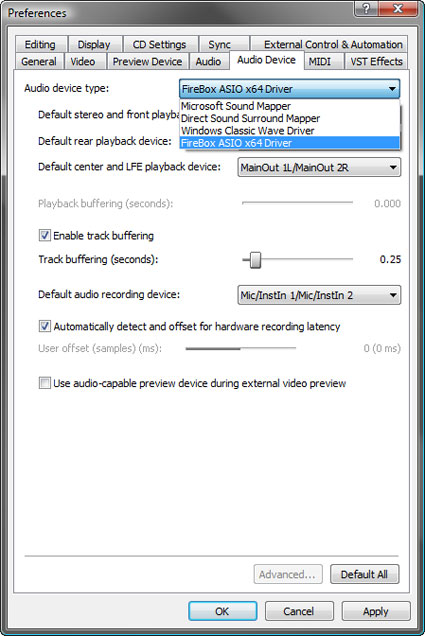
We've talked about sophisticated audio techniques in previous versions of this column (all of which you can find in the archives on our training page atwww.sonycreativesoftware.com/training). In this article, I want to focus on a basic—but powerful—function: recording a voiceover narration into your video project. In fact, the basics of recording that we'll discuss in this article are the same whether you're recording one track of narration or 24 (or more) tracks of a multitrack music recording of a band. Once you learn how to set your project up to record a narration track, you'll understand how to set up as many tracks as you need to record multiple sources either one by one or simultaneously. Say you have a video project under way. You've cut together all of the footage you shot and now it's time to record a narration. Further, say you don't have—or even want—a script for this video. You'd like your narration to be more of a free-form monologue based on the imagery of the video. One beautiful thing about having powerful audio tools wrapped up into your powerful video-editing software is you can record your free-form narration even as you view the video—all in the same project! To set your project up to record, first choose Insert | Audio Track to add a new track to record onto. Now you must give some attention to your audio routing setup. The hardware gear you have available to record with will dictate how you set things up. It will also have a lot to do with the quality of your results, so you want to make sure you've given these hardware choices a lot of thought. Nearly every personal computer you can buy today has a build-in audio device, sometimes called a sound card. These devices are typically capable of both recording audio and playing it back. But that's about all that can be said for them! The built-in audio devices on most computers are typically of very low quality with cheap components. In the spirit of, “you get what you pay for,” such devices are not likely to create very high-quality recordings. In fact, they may not produce even adequate recordings. Another critical component is the microphone you use. And the two are not entirely unrelated. If you use a microphone that's supported by the inputs of your computer's onboard audio device, you're probably using a very inferior microphone that will likely make even more inferior recordings. If quality isn't really important to your project—you just need to record some audio notes, say—then maybe you can get by with the cheap audio device and the cheap microphone that came with your computer. But if you need high-quality audio for your project, you're going to have to look at making a modest investment in gear before you can really go much further. You don't have to spend much more than $100 for a decent-quality microphone that will make all of the difference in the world for your recordings. Or, you can spend thousands for top-of-the-line gear for something that delivers pristine results. Most of us settle somewhere in between and acquire a nice, versatile microphone that can cover a variety of needs. Just make sure whatever you purchase can take the stress of the situations you'll be recording in. For example, if you need to do location audio recording, you're probably wise to avoid a fragile expensive vintage ribbon microphone! Your setup can be as complicated or as simple as you want it to be. For instance, you can find pretty decent USB microphones these days. This type of microphone bypasses your audio interface completely and connects directly to your computer through a USB port. Such a setup might be a good option for many people. On the other hand, some higher-quality microphones require extra power. That power might come from a battery, or it might come from a secondary source, known as phantom power which can be provided by some video cameras, audio interface devices, or mixing boards. You can avoid the issue altogether by using a microphone that doesn't require this extra juice. Assuming you want something more high-quality than most USB microphones, then you'll have to plug your microphone into an audio interface and since, as we already discussed, your computer's built-in audio interface isn't likely up to the task, you'll have to look into buying something new. Going with our assumption that we simply need to record a narration, you don't need an interface with a huge number of inputs. Many nice audio interface devices provide one or two high-quality microphone inputs directly, thus helping you avoid a complicated setup where you must first run the signal through an audio mixer. All of these hardware decisions are really outside of the procedure for recording into Vegas Pro, so I won't spend much more time on them. Just suffice it to say that the old adage, “garbage in, garbage out” applies here. If you have inferior hardware—microphones, audio interfaces, etc.—and you record into Vegas Pro with that hardware, you will end up with inferior recording results and it won't be the fault of Vegas Pro! In short, Vegas Pro will do the right thing—it will make a very high-quality recording of your very low-quality audio, thus preserving the original low-quality audio perfectly! So do a little research and find out what you need to have in order to create high-quality audio because Vegas Pro will perfectly preserve that too. Now that you have your hardware decisions out of the way, we can proceed with recording in Vegas Pro. First, you need to tell Vegas Pro where to “listen” for the audio signal you want to record. To do this, choose Options | Preferences. In the Preferences dialog box, click the Audio Device tab. Most high-quality audio interface devices utilize ASIO drivers. These are highly efficient and prevent latency—a noticeable delay in the audio. To utilize these drivers, select them from the Audio device type drop-down list as in Figure 1. If you're using a USB microphone, its driver will also appear in this list, so select that.

Figure 1: Click for a larger view

Figure 1: Specify your audio device driver.

Next, some audio interface devices feature more than one input for a microphone or other audio source. You can set the default input from the Default audio recording device drop-down list. But don't worry; you can override this later on the track you're recording onto if you want. When you're done making your choices, click OK. Before you start recording, you'll need to consider unwanted sounds getting into your audio. Of course, you need to consider obvious issues like noise from the surroundings: air conditioning, other people walking about, even the computer you're using. You want to find a very quiet room in which to record. You also want to try to find—or create—a “dead” space. A dead space is one in which sound does not bounce around and create echoes. A high school gymnasium is not a good choice because it's quite the opposite of a dead space with sound waves bouncing all over the hard surfaces. A room with carpeted floors, cloth curtains, and other materials that can absorb the sound waves and prevent them from bouncing around is a much better choice. But beyond these issues, you also have to consider the sound your own project might make. If you have music or other audio tracks in the project already, you'll need to turn your computer speakers down so you don't include the playback of those sounds in your new recording. Or, click the Mute button on any existing audio tracks in your project (other than the one you're recording onto).

However, if you need to hear your project's existing audio as you record the new audio, you'll need to set yourself up with a pair of headphones or earbuds so you can listen to the existing audio without having it end up in your new recording. Just make sure not to have the audio you're listening to playing so loud in the headphones that it ends up bleeding through to the microphone anyway. Now you're ready to record. To make sure you're seeing all of the controls in the track header for the track you want to record into, drag the bottom edge of the track header down to make it taller. Stop once you see all of the controls, as shown in Figure 2.

Figure 2: Click for a larger view

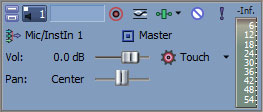
Figure 2: Expand the track header so you can see all of its controls.

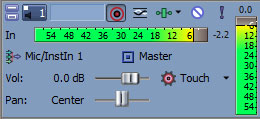
Not all of the controls you see on the track header relate to recording—in fact, only a couple do. Recall that you set the default record input back in the Audio Device tab of the Preferences dialog box and I mentioned then you can override that setting if you want to. To do so, click the Record Input button. From the drop-down menu, choose the name of your audio input device. From the cascading menu choose Mono orStereo depending upon which is appropriate. If you're using a single microphone, you'll likely want to choose Mono here. Finally, from the next cascading menu, choose the specific input into which you've plugged the microphone on your audio interface device. Back in Figure 2, you can see that I've chosen Mic/InstIn 1 for my device. Yours may well say something different, but it should be similar. Now, click the track's Arm for Record button. In the Project Recorded Files Folder dialog box, browse to the folder into which you want to save your recorded file. Most likely you want to point this to the folder that holds all of your other project assets (or a sub folder in that main folder). Click OK. As an aside, each project asks you to specify this record folder only once. To see this, click the Arm for Record button again to turn it off. Click it again to turn it back on and notice the Project Recorded Files Folder dialog box does not reappear. However, you can force it to reappear if you want to change your settings. To do this, click the Arm for Record button to turn it off yet again. Now, hold the Shift key and click the Arm for Record button one last time. The path is still set to what you specified a moment ago, but you can change it now if you want. When you're done, click OK. Notice a new peak meter appears in the track header as in Figure 3. This meter monitors the volume of the audio coming into the track, that is, the audio you are about to record. It's absolutely critical that you make sure this meter never reaches 0 dB (at the right end of the meter) in order produce a good recording. If the peak readout at the right end of the meter turns red, the audio coming into the track is too loud and your results will be disappointing.

Figure 3: Click for a larger view

Figure 3: It's critical to avoid peaking the record meter at 0.0 dB or higher.

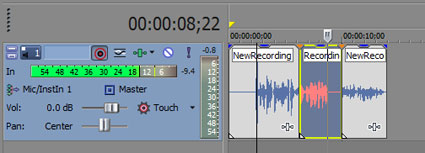
If that's the case, turn the volume down on the recording input of your audio interface. Ideally, you want the loudest signal coming into the track to peak between -6 and -2 dB as mine does back in Figure 3. You'll also notice my track's playback meter is registering audio. This indicates that the audio I'm recording is running through the track's signal path and out my master bus, which of course is connected to my speakers. If you need to hear the audio while you're recording, then you'll need to wear headphones to prevent that audio from looping through to the microphone again. Click the Record Input button and chooseInput Monitoring On from the menu. If you do this without headphones and the playback audio comes out of your speakers instead, the audio from the microphone will come out of the speakers and back into the microphone and repeat that process indefinitely. This causes a feedback loop and you're likely to hear a harsh, high ringing tone. If you don't want to wear headphones and don't need to hear what you're recording as you're recording it, click the Record Input button. Choose Input Monitoring Off from the menu. This prevents the audio coming into the microphone from moving through the track's signal path and out your speakers. You can turn this on or off for each individual track you're recording onto. Once you're happy with your recording levels and have your input monitoring set the way you want, you're ready to record. Click the Record button in the transport bar. The project begins to play and a new event appears on the track you're recording onto, shown in Figure 4. The red waveform in the event indicates the audio you are recording and the event continues to grow as you record more material. When you're done recording, click the Stop button.

Figure 4: Click for a larger view

Figure 4: A new event appears in the track and a red waveform indicates the audio you are recording.

The Recorded Files dialog box opens. If you know you made a mistake and don't intend to keep this recording, select the recorded file and click Delete. Confirm you want to delete the file and then click Done. The event disappears from the timeline and you're ready to try again. Do so now. When you stop, the Recorded Files dialog box opens again. If you're happy with the recording, click the Rename button and give your recording a new name. By the way; if you name the track you're recording onto before you record, the new recording acquires the name you give the track, followed by a number to identify the specific recording. Click Done. Now you can play your project and listen to what you have recorded. Say you're happy with the first half of your recording, but don't like the second half. You can create apunch in recording and replace the second half. To do this, split the event at the point where the part you want to record over begins. Make sure the portion of the event that holds the audio you want to replace is still selected. Reposition your cursor to start before the selected event and click the Record button again. Vegas Pro starts to play, but the audio in your track is not replaced by newly recorded audio until the cursor reaches the selected event. Vegas Pro only records into the selected event. Figure 5 shows my project where I have three events. The middle event is selected and the new recording ends up in that event, but not the first or third events.

Figure 5: Click for a larger view

Figure 5: Only the middle event is recorded into since it is the only selected event.

Once you've recorded over the selected event, it actually holds both the original and the new recording. Right-click the event and choose Take from the menu. You have several options in the menu, including the option to choose the take you want from the bottom of the menu. This way you can switch back and forth to find the take you like the best. Recording a voiceover into Vegas Pro really isn't a complicated procedure once you have all of your hardware in place and set up properly. Still, there are several things that need to be in place to get the job done right and hopefully this article has given you a good idea of the issues involved. For more training, including archives of articles like this one, free training videos, free archived webinar presentations, training DVDs, and more, visit the training page on our website at www.sonycreativesoftware.com/training.

  • © 2003-2014 Sony Creative Software, Inc. All Rights Reserved.