Processes & Proced...

CIS and Epson Printer Troubleshooting

Tools:

  • syringe with tube
  • syringe with tube (2nd one)
  • cleaning solution for inkjet
  • isopropyl alcohol 99%

1) Air in the system - method 1

  • remove small plug in top of cartridge and stick end of syringe in hole and draw air until ink in drawn
  • eject drawn put ink into bulk ink container
  • always clean syringe with warm water before going to the next colour
  • repeat for all hoses that appear to have air

2) Air in system - method 2

  • pull cartridges out of carriage
  • lay cartridge stack on it's side
  • stick syringe into hole in the bottom of the cartridge and draw ink until air is gone from hose
  • eject ink into bulk ink tank
  • clean syringe with warm water
  • repeat for each colour that has a problem

"Replace Cartridge"

  • follow the prompts and click through the <next> and <ok> buttons until.....
  • window talks about next step is to "charge" the cartridge and prompts <ok>
  • push the button on the circuit board (attached on the back side of the cartridges) in the printer
  • then click the <ok> button to start the charging
  • finally click the <finish> button and you're done

Conclusion

Tried cleaning the ink many times and many different ways.  Always resulted in the print pattern being bad...especially the black.  Eventually got all the inks printing great except the black which would print close to fine and then bad!  Replaced the with original and it worked fine!

Creating DVD's Using Toshiba DVD Recorder

Quick Steps for Toshiba DVD Recorder Que up correct "Original" on screen. Make sure the "Edit Menu" is NOT showing on the monitor or the Record button will not light up.

00. Set the Bit Rate

-from the blank page select Quick Menu, go to User Record Quality

-The Bit Rate must be determined and set prior to recording the original. Setting 1 through 5 are only a table of presets that can be selected from or can be customized, then selected. Depending on how long the video is compared to the disk space of 4.3 Gigs will be the deciding factor of how the Bit Rate is set here. It is better to give a buffer of time rather than leave a very narrow margin of time.

0. Create original

-hook up deck (example: vcr) to the Toshiba deck, power on

-note: if you can not get the video image to show on the monitor; you may have to re-boot the Toshiba and/or try using a different Input - currently Input 3 seems to work. :/

-play from Play deck, record from Toshiba (while in HDD mode on the Toshiba deck). If you are not in HDD mode there will be no "Original" created and it will burn to the disk yet be unattainable (go figure!).

-"Original" clip will appear in content menu as the latest "original" with the latest number after stop record has happened.

1. Trim original - Create Video 

-Firstly, be within the Content Menu page. THEN.... with the desired clip selected....

-QuickMenu, Chapter Function, Chapter editing.

The "Enter" button "Divides" the clip. Divide to find new beginning, and end point, thereby trimming the original clip.

Make sure the clip is situated at the beginning. Play, stop at first frame. "Divide" with Enter button to mark first Cut point.  Play/FF to end of Clip. Divide/Cut mark end point.

-navigate with arrow buttons to select start clip. Save (yellow button)

2. Create playlist from the trimmed file (original file)

-Quick Menu, Edit Function, Playlist Editing,

-default should be PRE-selected, if not then select the original file you are working on

-then hit Chapter (* button (green)(( the green button is multi-function; it can be "chapter"  or "title" - know when and the difference!))

-select the trimmed clip with arrow buttons

-IF other clips were created because of unused tape navigate to them as well and press Enter to drop them to the timeline as well.

Enter

Cursor is created on the timeline, Enter again to move the clip to the timeline

Note the time for record on Excel sheet. Save button(yellow button)

-Created playlist is now displayed (showing on HDD)

-Save (yellow button). Playlist created (Screen is advanced to Content Menu title list).

3. Create auto chapter marks for the playlist from the playlist file

Quick Menu, Chapter Function, Auto-Chapter Create

-Enter, select chapter marks (1 hour = 5 min; 2 hour = 10min)

-Enter. Playlist Chapters are now done, there will be no indication on screen; can change if needed.

4. Dub the playlist to the DVD

-Quick menu, high speed dubbing, enter (saves original from HDD to Disc)

-see onscreen progress bar!!  NOW WAIT! DO THE OTHER MACHINE(when doing multiple VCRs).

5. Finalize the DVD

*************Switch to DVD to finalize***************

-easy nav

then scroll down to the

-finalize button THEN press Enter!

-OR (instead of easy nav)  edit menu button under cover (this button bypasses easy nav menu)

Click the NEXT button.

Scroll up (up arrow) button to the Disc Name/Edit Name position.

Press ENTER to:

Name disk.  Use arrows to select Edit Name. Enter.

Use keyboard.

Save (green button) Select Next (Enter).

Select colors for Title page and Chapter page.

Screen populates with title and chapters. Beeps when done.

Take disk out.

Start again.

------------------------------

ERRORS:

see processes and procedures in case of Error 14

- Hit Display button under cover!

------

If the DVD Disk is rejected, it may be because you are on the first burn of the day and the disk is the fresh disk that was left in the machine overnight.  Simply, open the tray and close it. Presto!

PAL Hi8 or 8mm Video Transfers

Overview Hi8 or 8mm video tape in PAL format needs to be digitized into NTSC format....either for computer digital file or DVD or Blu-Ray.

Use the PAL Hi8 camcorder to read the tape, out put through the Canopus ADVC 110 box to the PC via Sony Vegas capture.

Equipment

  • Sony CCD-TRV69E PAL Hi8 camcorder
  • Canopus ADVC 110 (the 100 or 300 would also do fine)
  • PC with Sony Vegas Pro

Steps:

  1. Switch the Canopus box from NTSC to PAL by changing DIP switch (Video Format switch 6) to ON. ALSO, ensure that switch 5 is set to OFF. Reverse these switches when done with the PAL session to return the Canopus back to normal NTSC capture settings: 5 = ON, 6 = OFF.
  2. Make sure the Canopus box is turned off and on before changing DIP switch and turned back on (ie. the firewire is plugged in to power the Canopus ON and unplugged to turn it OFF).
  3. There are also two (2) settings in the Sony Vegas Capture tabs that need to reflect "PAL" instead of "NTSC".
  4. Connect composite from Sony camcorder to Canopus box.  Use the S-Video and Left and Right audio connections.
  5. Ensure the firewire is connected to the Canopus box and the PC
  6. Open Sony Vegas capture for DV.
  7. Load the PAL tape into the camcorder
  8. Turn the camcorder to VCR mode (switch is on the lens barrel)
  9. Press the play button on the camcorder and check the Vegas capture window
  10. When everything is done do not forget to change the DIP switch back

Network Speed Slow and CPU Slow

Overview Copying to or from Apollo was extremely slow....about 100kb/s or less...not even in the MB range.  In addition when copying to or from Apollo the CPU would grind!  Looking at the task manager a "system" task would pop up and be taking 30% or more of the resources to the point of music playing would breakup and you could hardly do anything on the PC....REAL REAL SLOOOOOWWWW!

Note:

Did notice that Apollo and Thor are using the Home network and Space and Xavier are using the Work network settings.  This should not make a difference....I think.  All firewalls have been disabled.  Before and after network upgrade did not make any difference.  Upgrades included cabling to Cat6A and a "new" managed switch to replace the Netgear unmanaged 8 port one.  Everything is gigabyte....NIC's, switch, cable (10GB actually).  Realtek TL8111E driver looked up-to-date (actually the driver on the ASUS website was older than the one on Apollo).

Solution: Disabling “Large Send Offload (LSO)”

Large Send Offload is a technique of improving network performance while at the same time reducing CPU overhead. Apparently it does not work very well, so it was suggested to disable it. If you would like to know about LSO, check thisMSDN article from 2001.

LSO is an option located in a Device Manager under your network adapter, so this solution requires Administrator Privileges.

Follow these steps:

  1. Open Start Menu, right-click on Computer and select Properties
  2. Under Control Panel Home located on the left side of the window click onDevice Manager
  3. You will get a list of all devices on your machine. Expand Network Adapters.
  4. Find your Network Card and double-click on it.
  5. Select Advanced tab. You will get a list filled with different options.
  6. Select Large Send Offload V2 (IPv4) and set the value to Disabled
  7. Do the same for Large Send Offload V2 (IPv6) if it is available
  8. Click OK

After clicking OK, I tried to send a file over the LAN network. The transfer speed started very slow, but it was gradually picking up speed. I decided to restart the computer and try to send that file again and this time it worked like a charm.

Now that sending of files worked as it should, I also checked speed for receiving files. It turned out that it was still slow but all I had to do to fix that was to disable Large Send Offload V2 on the other computer. Once done,  the problem was solved for receiving files as well.

Reference:

http://www.howtosolutions.net/2013/06/fixing-slow-sending-or-receiving-of-files-through-lan-network-using-windows/#.U08Vq_ldXE0

http://www.peerwisdom.org/2013/04/03/large-send-offload-and-network-performance/

Sony DSR-2000 VTR

Overview: Using the Sony DSR-2000 we can now do a few more formats.

Formats:

DVCPRO or DVCPRO25 - 25Mbps.  L or M sizes.  This tape has a yellow tape cover.

DVCAM.  Standard (184 mins) or mini (40 mins) sizes.

miniDV

Wiring:

Tested both the SDI (embedded digital  audio) and the component XLR combos.  Also tried the AES for audio and it was empty!

Cable is labelled DSR 2000 SDI OUT (this is out from the VTR to the PC) needs to be plugged into the breakout box: SDI IN ("top" of box next to the AJA label)

Cable labelled DSR 2000 SDI IN needs to be pluuged into the breakout box ONLY if we are writing from the PC to the VTR:  SDI OUT on the breakout box.

Machina:

Settings tab

Set the Video input: single SDI

Set the audio: Embedded SDI  (tried the AES BNC option and empty recording for audio)

Capture tab - File Options

Set File Type to: AVI

Set Video/Audio:  Video-Audio

Set Video Subtype: 8-bit YUV 4:2:2 - "2vuy"

Testing:

Tested both component plus XLR and SDI (embedded audio) and found that  the audio tracks were extremely close and the colour of the video was better using the SDI.  Seemed the component added a little more unnatural saturation.

Cables to use in transferring: S-Video, Composite, Firewire

Overview When transferring from a VCR to the Canopus to the PC via firewire I tested all the possible configurations such as the following:

VCR -> connection -> Canopus -> firewire -> PC

VCR -> firewire -> PC

Where the connection was: firewire, composite, and s-video.  And the Canopus was Canopus ADVC 100 or 300.  And the Canopus was set to use either IRE 0 or 7.5.  Lots of variables tested and many screens shots of the video and the scopes for each image (see Projects: 14-02-24 TEST s-video vs ieee vs composite from 8mm video, 14-02-26 TEST canopus 300&100 s-video vs ieee vs composite from 8mm video, 14-02-27 TEST canopus 300 - miniDV s-video, composite, firewire.  MiniDV Data: 10-02-27 TEST (Johnson) C300 s-video, firewire, composite).

Summary

Use the Canopus box set to IRE 0 and use the cables in the following order from best to least:

1)  Firewire (through the Canopus it appears that the firewire is only affected by the IRE setting....the other settings do not appear to impact anything)

2)  S-video

3) Composite

When using IRE 0 the top and bottom of the colours are not as crushed when being recorded onto a PC.  This setting would not apply if the VCR is routed to the DVD recorder as it would bypass the Canopus box.

Update

IRE 0 is used in Japan and IRE 7.5 is used in North America.  Now again these a analogue standards and design for output to TV's.  IRE 7.5 looks better and 0 looks a milky color....in fact IRE 0 just does not crush the blacks as much.  If doing a large number of 8mm video tapes and using two inputs (recroom and den) then we MUST use the same settings on the Canopus if we're capturing to PC.   Currently using IRE 7.5 for both.

ACDSee Pro 7 Editing B&W Images

When an image is black and white, many of the editing tools will not work.
Therefore you have to trick the program into thinking that you are working with a color image.
With a b&w image in the Viewer mode, go to Tools/Modify/ Change Color Depth and select True Color.
You may have to save this new image with a new name, so as not to overwrite the original image.
Now you can add text, etc and then just save or save as the image when you are done .

Payroll Liability - submit to Cdn Gov

Overview Every month the payroll deductions (income tax, CPP, EI) must be remitted to the Federal Government.

When

Due on the 15th of every month for the previous month.

UPDATED (Jan 2016):  Now DUE on the 15th of the month following each quarter.  ie. Apr 15, July 15, October 15, January 15.

Steps

1)  Go to QB - click <Pay Liabilities> button on home page

2)  Click "Pay Liabilities" icon

3)  Confirm date range is the previous month and click okay

4)  Click <PD7A> button to generate report.

5)  Go to: http://www.cra-arc.gc.ca/mypayment/

Note:

We qualify for quarterly payment because we meet the following criteria:

  • average monthly withholding for the previous year was less than $3000
  • you have a perfect record of compliance
  • you have a prefect record of GST compliance

PST - Preparing To File in QB - Self Assess Procedures

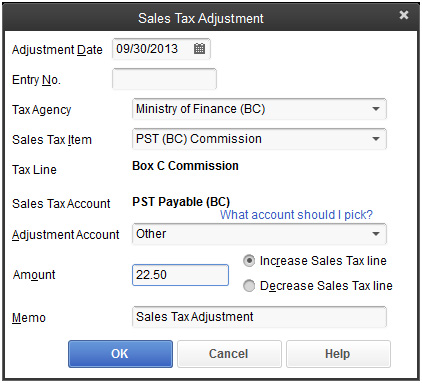
When processing PST don't forget the COMMISSION!  This is also an adjustment. PST Self-assessment when filing taxes

1)                  Go to manage taxes

2)                  File Sales Tax  (PST)

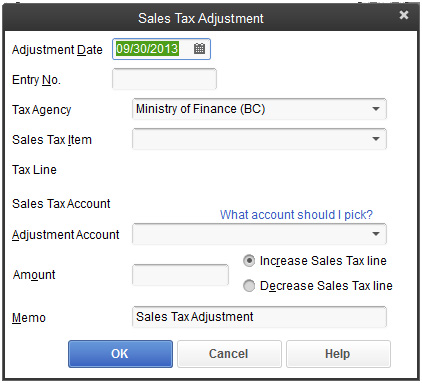
img1

3)                  "amount not assigned a line....." message.  These are your SELF-ASSESS PST items.

4)                  click on <Add to Return> button.  And the following should display.....

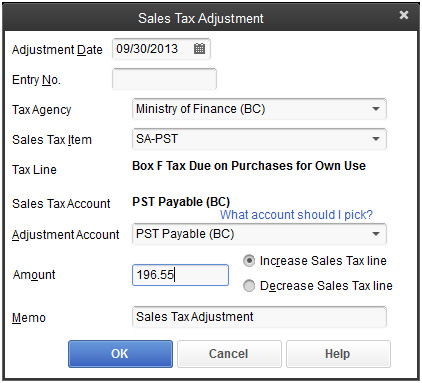
img2

5)                  Select the "sale Tax Item" for self assess....and fill in as follows

img3

6)                  Then collect the PST commission (box C) by clicking the <Adjust Return> button on the "File Sales Tax" window and enter as follows:

img4

7)                  When filing the FORM....make sure that you enter the purchase amount of the items that you are SELF-ASSESSing on.  Take the self assess amount and divide by 0.07 to get the amount for line E.  Self assess tax goes in line F.

see document in LHF/financial/PST Self - film PST.docx

PinPad Troubleshooting (i3070)

Issue The pinpad does not display the "idle prompt".  Displays firmware stuff etc.

Solution

Check the settings and compare them to the port settings.  Should be com3.  Sometimes the port settings under the device manager get changed.  Change the device manager's port settings for com3 back to the device assisant/config settings.

Test Number:

When prompted for an account number in the device assistant direct test, use....

5k3k2k3003

Troubleshooting GPT Protective Partition Issues

Troubleshooting GPT Protective Partition Issues
This problem happened when connecting a LaCie drive to Flag and I could not read or write to the drive.  The following instructions solved it quickly.  Be WARNED this CLEARS the drive.....
Sometimes, after connecting an external hard drive Windows Disk Management reports it has a GPT Protective Partition and denies permission to reformat the drive. This article will discuss how to overcome this.

Sometimes, after connecting an internal or external hard drive to your system, Windows Disk Management says that it is prepared with a GPT Protective Partition. This will mean that you cannot repartition or reformat the drive. This article will discuss how to overcome this issue.

What is a GPT disk?

The GUID Partition Table (GPT) was introduced as part of the Extensible Firmware Interface (EFI) initiative. GPT provides a more flexible mechanism for partitioning disks than the older Master Boot Record (MBR) partitioning scheme that has been common to PCs.

A partition is a contiguous space of storage on a physical or logical disk that functions as though it were a physically separate disk. Partitions are seen by the system firmware and the installed operating systems. Access to a partition is controlled by the system firmware before the system boots the operating system, and then by the operating system after it starts.

The GUID Partition Table (GPT) Scheme was implemented under Microsoft Windows XP x64 edition, Windows Server 2003 (64-bit), Windows Server 2003 SP1 (all versions), Windows Vista, and Windows 7.

In a nutshell, GPT Partition was developed to get around known, MBR partition size issues; the maximum size for a MBR partiton is 2 Terabytes (TB). GPT partitions enable this limit to be exceeded.

Note: For more comprehensive information on GPT Protective Partitions, refer to the following Microsoft link: http://www.microsoft.com/whdc/device/storage/GPT_FAQ.mspx

GUID Partition Table (GPT) partitions are also found in Mac OS X versions 10.4.6 and newer. All Intel-based Macs require a GPT partition on a boot volume, whether it be internal or external.

When connecting an internal and/or and external hard drive to a Windows XP (or newer), 32-bit operating system, you may find your drive is inaccessible and that Disk Management reports that the drive has a GPT Protective Partition on it. The drive cannot be repartitioned and formatted in this state. This is because the internal or external hard disk was previously prepared on either a Windows or Macintosh computer with a GPT partition.

Normal Disk Management facilities will not overcome this issue. To prepare this drive, you will need to use the Windows diskpart command-line utility. The following procedure provides the steps for cleaning a GPT Protective Partition from a hard disk drive connected to an existing Windows XP (or newer), 32-bit Operating System.

This is a data destructive process. This procedure not only removes the drive's partition, but also removes the Drive Signature. It is highly recommended that you backup any/all critical data on the drive before proceeding. You must open Disk Management and document the Disk Number of the drive containing the GPT Protective partition, as you will need this information later in the procedure.

  1. Determine the disknumber assigned to the GPT-protected drive.
    1. Right-click on (My) Computer.
    2. Choose Manage.
    3. Select Disk Management (listed under Storage).
    4. Look for the drive that is identified as GPT and note the Disk number (such as Disk 1).

  2. Open a Command Window. From the command prompt, type diskpart and press Enter. The diskpart prompt will open.
  3. From the diskpart prompt, type list disk and press Enter. A list of disks will appear in a text format. You will return to the diskpart prompt.
  4. From the diskpart prompt, type select disk disknumber (for instance, if the disk containing the GPT Protective partion is Disk 2, you would type select disk 2)and press Enter. A message appears saying that the disk is selected. You will return to the diskpart prompt.
  5. From the diskpart prompt, type clean and press Enter. At this point the drive's partition and signature a removed. You will return to the diskpart prompt.
  6. From the diskpart prompt, type exit and press Enter. Type exit once more to close the Command Window. At this point, the internal and/or external drive can be re-initialized, partitioned and formatted.
  7. Launch Disk Management, and to initialize the disk:
    • Use the Initialize and Convert Disk Wizard...

      -OR-

    • Close the Wizard, right-click on the disk in question and select Initialize Disk from the drop-down menu.
  8. Once the drive is initialized, continue using Disk Management to partition and format the drive.

Additional Information: For more information on the diskpart command, refer to the following Microsoft TechNet article. From this article, you will learn about other diskpart command line syntax as well as methods for converting a GPT Protective Partition to a MBR partition.

Flash Video Tutorial: GPT Protective Partition Issues

View Flash Click here to open the movie.

Reference:

http://knowledge.seagate.com/articles/en_US/FAQ/207837en

CineCap Output File Sizes

Sequenced Images: JPEGs        Each 16mm JPEG is about 0.4MB

PNG's         Each 16mm JPEG is about 3.5MB

TIFs           Each 16mm TIF is about 5.5MB.

Video

  1. It seems that the canon hv30 was a 1080i camcorder and the canon hv40 is a 1080p camcorder?
    1. i.      Because nothing moves
  2. The intensity Pro card uses “video standards” of 1080i…huh?
  3. On your website you mention compress mjpeg HD or uncompress  bitmap file ….is this done thru the capture card…?
    1. i.      Thru the capture software.
    2. ii.      Lossless or slightly compressed (20%)
      1. One could really not see the difference
    3. iii.      Lossless – raid recommended --- resource intense
      1. 100 feet of 16mm -or- 50 feet of 8mm/S8 film with a speed change built into the footage will require about 7 gigs of hard drive space if you choose lossless or about 1.75 gigs if you choose compressed.
      2. 100 feet of 16mm -or- 50 feet of 8mm/S8 film without a speed change built into the footage will require about 4 gigs of hard drive space if you choose lossless or about 1 gig if you choose compressed.

Glossary Of Film Terms

Here's a glossary of film terms and their meanings: Answer Print

The answer print, or first trial print, is the first print made from edited picture and sound track, incorporating fades, dissolves and other effects. The answer print is usually printed from the A and B rolls. The answer print is not guaranteed to be perfect but represents the best judgment of lab's timers.

Timing corrections, if any, should be requested by the customer after viewing the answer print and prior to ordering intermediates or release prints.

Release Prints

Release prints are generally struck from either the A/B rolls or from the Internegative and optical track for multiple printing once the answer print has been approved.

Optical Sound Track

An optical soundtrack is the soundtrack negative that is printed onto the side of the finished film.  It is required for a sound print and is usually made from the mixed magnetic sound.

A Wind or B Wind

Wind refers to the relationship between image direction and emulsion position.  Images in B-wind read correctly through the base.  All camera negative original is B-wind.

Colour Reversal

Color reversal film is cheaper because the camera original is processed into your projectable print whereas with color negative there is a development of the camera original into a negative and then a projectable print is created from that. Reversal does not have as good color reproduction or latitude. You also can't have any more prints made from a reversal stock unless you have an inter-negative made, which is very pricey and degrades the quality of the finished print.  Color Reversal has a nice look for special purposes (70's look) and is fine for transfer to video but really not suited for making film prints.

Colour Negative

Color negative there is a development of the camera original into a negative and then a projectable print is created from that. Colour negative has better color reproduction or latitude than colour reversal.

Sepmag

Designating a film or television programme for which the sound is recorded on separate magnetic material and run in synchronism with the picture.  Film that is completely covered with audio magnetic material.  For more info see:  http://en.wikipedia.org/wiki/Sound_follower

Comag

Magnetic (mag) tracks are recorded onto oxide stripes on the edge of the film, which are read by playback heads in the projector. Mag tracks work the same way as audiotape and look similar to tape, appearing as a dull, brownish coating on side of the film.

16mm news reels often had this type of sound recording as it was quick.  Defined as: composite sound print (picture and track).

Internegative

An internegative is a motion picture film duplicate. It is the color counterpart to an interpositive, in which a low-contrast color image is used as the positive between anoriginal camera negative and a duplicate negative.

After a film is shot, the original negatives—taken directly from the camera equipment—are edited into correct sequence and printed onto fresh stock as a cohesive film, creating an interpositive print used for color timing. From the interpositive, answer prints, which include the color-corrected imagery and a properly synced sound track, are made. Once approved by the studio, the final answer print is made into an internegative used for striking copies that will be delivered to theaters for viewing.

References:

Alpha Cine, Seattle

http://www.alphacine.com/resources/faq.php#What is your turnaround time?

All Betacam and Umatic Tapes via AJA Kona LHe

Overview
Transfer Betacam or Betacam SP or U-matic or U-matic SP both large and small cassette to digital.
Equipment:
For Betacam:  Sony PVW2800 VCR deck
For U-matic:  Sony VO-9850 VCR deck, DPS-295
For all: AJA Kona LHe capture card installed in SPACE, AJA breakout box
Steps:
  • Make sure that the component cables (3) and XLR cables (2) are connected to the breakout box.  The cables should all be labelled PVW2800 for Betacam processing or U-Matic for U-Matic tape processing.
  • Open Machina:
    • Under the "Setup" tab, select the audio and video folders to capture into.  These folders can be the same especially if the A/V file captures into one file.
    • Set the following under the "Capture" tab and the "File Options" section (to the right of the preview pane)
      • File Type: MOV Movie
      • Video/Audio: Video - Audio
      • Video Subtype: 8-bit YUV 4:2:2 '2vuy'
      • Audio Subtype: 48Hz 32-bit PCM Stereo
    • The file resulting from the above configuration will work for both PC and MAC environments.  There are many other options that work in some cases, but this is the only one that works for both PC and MAC.
  • Below the Machina preview pane on the left, make sure the tab is "capture now".  Click the red record button.
  • Start the VCR ... push "Play"
  • when the capture is done, click the red record button to stop the capture.

Issues with Capture Using Vegas

Unfortunately, Sony Vegas cannot be used to capture the footage from the AJA Kona LHe card as there is a bug in the Vegas software.  One can select the capture /sdi options and the AJA card, but the resulting file will be missing the audio.  I contact Sony support and they acknowledged the bug and said it would be fixed in a future release/build.  Last build I checked the problem was ver 12.0 build  394 (Nov 6, 2012).

Table of Codecs And Results

The following table tests Machina's various codecs on a PC and their compatibility with a MAC.   Note that VLC was not tested on the PC as I figured the results would be similar to the MAC.  "WinMP" is Windows 7 Media player.

Legend: A - audio only, V - video only, Y - both audio and video.

Testing Machina codecs for MAC
MAC PC
Codec Wrapper Type bits color space Realplayer Quicktime VLC Quicktime WinMP
2Vuy mov YUV 8 422 A A Y Y A
2Vuy avi YUV 8 422 N N V V V
2vuy mov YUV 8 422 Y Y Y Y A
2vuy avi YUV 8 422 V V V V V
8bit RGB apple mov 8 A A A Y A
8bit RGBA 444 mov 8 444 A A A Y A
10bit RGB full A mov Log RGB 10 444 A A A Y A
10bit RGB full A avi Log RGB 10 444 N N N V V
10bit RGB full B mov Log RGB 10 444 A A A Y A
10bit RGB full B avi Log RGB 10 444 N N N V V
10bit RGB log mov Log RGB 10 444 A A A Y A
10bit RGB log avi Log RGB 10 444 N N N V V
10bit RGB smpte A mov 10 A A A Y A
10bit RGB smpte B mov 10 A A A Y A
bgr avi RGB 8 444 V V V V V
bgra avi RGBA 8 4444 V V V V V
uyvy avi YUV 8 422 N N V V V
V210 mov YUV 10 422 A A A Y A
v210 mov YUV 10 422 A A A Y A
v210 avi YUV 10 422 N N N V V

Scanning Damaged or Single Negatives with Nikon Coolscan

Overview If the strip of negatives is badly damaged or the negatives are strips of 2 or 1, then you must use the FH-3 film strip holder and the standard adaptor.

Equipment:

Nikon Super Coolscan 5000 ED, FH-3 film strip holder, standard slide adaptor MA-21.

Set up - Nikon Scan:

  • If the negative is B&W, make sure to set the film type to "Neg (Mono)" and to turn off "Digital ICE".
  • If the negative is colour, set the film type to "Neg (color)", and Digital ICE is on.

Set up - FH-3 Film Strip Holder

  • Open FH-3 by unclipping the middle clip and the two end clips
  • lay the film in the holder with emulsion (dull) side down and images lined up to the frames (you can close the holder mostly and then adjust the film to the frames
  • Place slide adaptor MA-21 into scanner
  • stick FH-3 into slot
  • you can scan three images by manually scanning an image and then moving the black plastic tray to the next image
  • once three have been scanned, stick the other end of the FH-3 into the slot and proceed to scan the other three images one at a time

Vinyl Records - Digitizing

Overview This article provides information on digitizing vinyl records.

Equipment

Audio Technica AT-LP120 USB turntable, 78 stylus (yellow), jeweler's flat balded screw-driver, MUSIC (recording PC), stereo system, Magix Audio Cleaning Lab software.

Change Stylus (needle)

We have two stylus, one for LP's and 45's (green), and one for 78's (yellow).  Never play a record with the wrong needle (it can play but it WILL damage either the record or stylus or both).

1)  Release the headshell assembly from the tonearm by turning the locking ring clockwise.

2) Carefully remove the headshell assembly and turn it over so the stylus is pointing upward.

3) Remove the stylus by taking a flat bladed jeweler screwdriver and carefully prying the stylus assembly from the cartridge.  Pry between the belly of the cartridge and the plastic assembly holding the stylus.  The stylus assembly should come straight up from the cartridge.

4) Push the replacement stylus assembly straight down onto the belly of  the cartridge until it fits snug.

5) Replace the headshell assembly back onto the tonearm and lock with the locking ring (counter clockwise a few turns).

6) The counterweight should be adjusted for the different stylus:

a)  33/45 stylus:  about  1.8 grams

b) 78 stylus: about 2.1 grams

Film Transfer Questions

1)  Why does my AVI file look interlaced in AfterEffects? The capture is done using a interlaced 60i sensor and the data is passed to the PC via a BM Intensity Pro card.  When the footage is processed on the PC the software takes the bottom and top frames of the interlaced input and creates a progressive frame.  Bottom-line is that there is nothing I know of the setup that can be changed to create a different progressive output.

APS or Advantix Film Developing

For DEVELOPING check out Vistek: http://www.vistek.ca/digitalphoto/labservices/photofinishing.aspx

Film Rescue International may also develop this type of film.

Advantix or IX240 or APS

Introduced in 1996, and currently no longer made.

Processed or Not?

The film is on a polyethylene naphthalate (PEN) base, and is housed in a single-spool 39 mm long plastic cartridge. The basic diameter is 21 mm, while it measures 30 mm at the slot where the film exits. The slot is protected by a lightproof door. It is available in 40, 25 and 15 exposure lengths. The film surface has a transparent magnetic coating, and the camera uses this information exchange (IX) system for recording information about each exposure. The camera handles winding and rewinding automatically, to the extent that partially exposed films can, in certain cameras, be removed and used later. Numbered symbols (called 'visual indicators') on the cartridge end indicate the status:

  1. Full circle: Unexposed
  2. Half circle: Partly exposed
  3. Cross sign: Fully exposed but not processed
  4. Rectangle: Processed

Additionally, a tab on this end of the cartridge indicates that the cartridge has been processed.