transfers

Film Transfers - How Long Does It Take

16mm Film Scanning:   6 minutes per 100 feet

Processing (Negative):  19 minutes per 100 feet

Scanning and processing:    26 minutes per 100 feet

Cleaning: extra time

8mm Film:

Scanning:   5 minutes per 50 feet

Processing:  15 minutes per 50 feet when processing a file on N to C on Flag

Processing:  18.5 minutes per 50 feet when processing a file on N to N on Flag

Scanning and processing:    20 to 24 minutes per 50 feet

Cleaning: extra time

Copying Files to a Mac formatted drive in Ubuntu Linux

Today I figured out how to copy files to a Mac formatted drive in Ubuntu Linux for the purposes of a film transfers and why it doesn't usually work. Ubuntu Linux is capable by default to read HFS+ (most common current mac filesystem) and write to it unless journalling (a feature of the filesystem) is enabled. In this case, Ubuntu, or any other system except for OSX can only read the contents of the drive.

The default way to format a drive with DiskUtility on a Mac is to HFS+ with journalling on. Because there is no easy button for toggling it off, most people giving us drives formatted for use primarily with a Mac that have journalling enabled.

Journalling is great - it provides a way for a hard drive to very very quickly find the last known "good point" when it is unexpectedly snapped off due to a power failure or fails in other ways. It can prevent a lengthy rebuilding of the filesystem and have you up and running in seconds again. Journalling is required on any Mac boot drive. NEVER DISABLE JOURNALLING on the boot drive of any Mac.

You may need to disable journalling if you want to use Linux to copy files to external USB & FireWire drives.

Unfortunately, the only way to do this that I have found so far is on a Mac. Even on a Mac, since Leopard (OSX 10.5) the option to disable Journalling in the Disk Utility was removed. The functionality still exists in the terminal interface to diskutil though.

I have tested the following steps for disabling journalling on an external drive on Snow Leopard (OSX 10.6.4)

  • Image that we want to disable journalling on an external drive named "Lucy"
  • Open Terminal.
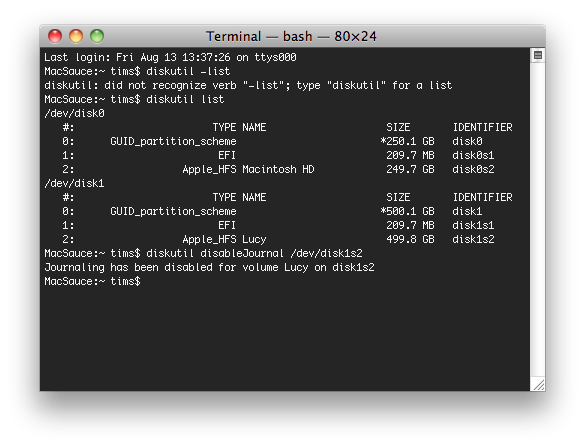
  • Type "diskutil list"
  • You will see something like this.

  • You can see that the actual volume named "Lucy" is disk1s2. The preceding volumes in the same list are partition information. Don't mess with them!
  • First you need to unmount the drive. You can do this from the finder or desktop by "Ejecting" the drive.
  • To disable journalling on Lucy, you would now type "diskutil disableJournal /dev/disk1s2". Obviously replace "disk1s2 with your own volume's identifier.
  • If it works, you will get the message "Journaling has been disabled for volume Lucy on disk1s2".
  • If it fails, you may want to try the same command as root by adding sudo to the beginning of the command. This may require you to enter root's password.

Unfortunately, we aren't done yet. Typically, we create a folder called "tmmedia" on a customer's drive to copy our files to. Doing this on while using the Mac is the most painless.

When you get to the Linux computer you will use, you will need to start terminal and navigate to the drive. Usually the drive is located at /media/Lucy/ in our situation.

  • Type "cd /media/Lucy/" to navigate there in Terminal.
  • Now we should already have created a folder called "tmmedia" on the drive.
  • We need to change permissions so that we can write to the drive.
  • The easiest way to do this is to type "sudo chmod 777 tmmedia" assuming that we have navigated here already and that the folder is called tmmedia.

Now we can finally use the Linux browser to simply drag and drop the files we want to copy.

Once the copy is complete, if we want to re enable journalling to keep our customers' files safer, simply start Disk Utility on a Mac, click on the drive, and then click on the big green enable journalling button in the middle of the graphical user interface.

8mm or Hi8 or Digital8 to DVD Transfer Procedure

(Buttons) are displayed in parenthesis and "Menu Items" are displayed in quotations Note: If you press (Content Menu) and a blank screen appears, simply press the button again

Steps:

  1. Hookup Hi8 Camera (referred to as Hi8) to HDD / DVD Video Recorder (referred to as EDIT) via 3.5mm to RCA Cable
  2. Ensure that tape write protection is on (red tab at bottom of cassette is closed)
  3. Insert tape into Hi8 camera
  4. Rewind tape to start
  5. Press (HDD) on EDIT's front panel
  6. Set Data rate on HDD - need to add more to this
  7. Press (record) on EDIT and press (play) on Hi8
  8. Estimate the play time on the Hi8 and check back when it might be done
  9. When the recording is complete, press (stop) on EDIT and (stop) on Hi8
  10. Check to make sure that the rest of Hi8 source is really empty, then rewind tape and eject
  11. Put a transfer number sticker on the tape
  12. On EDIT's remote control do the following to create a chapter without gross start and end (essentially trim the start and end of the clip):
    1. Press (Content Menu) then press (Quick Menu) and select "Chapter Function"->"Chapter Editing"
    2. Press (play) to seek to the beginning of the tape recording past any glitchy or gross spots
    3. To make fine adjustments, use the (Frame/Adjust) directional buttons to scrub back and forth
    4. Make sure the on-screen cursor has "Divide" selected and press (Enter) to create a chapter division
    5. Use the (main directional keys) to skip to the end of the recording and then press (play) to find the end of the recording just before the gross tape ending
    6. To jump in smaller increments, use the (Pciture Search) directional buttons to scrub slower than the (main directional keys)
    7. To make fine adjustments, use the (Frame/Adjust) directional buttons to scrub back and forth
    8. Make sure the on-screen cursor has "Divide" selected and press (Enter) to create a chapter division
  13. On EDIT's remote control do the following to create a play-list to dub the non-gross section to DVD:
    1. Press (Content Menu) then press (Quick Menu) and select "Edit Function"->"Playlist Editing"
    2. Move cursor to the Original title that was recorded on EDIT and had chapter divisions inserted
    3. Press the (Green Button with the Star above it) to switch to chapter selection mode of that Original title
    4. Select the middle scene, the good stuff, and press (Enter)
    5. A red cursor will appear in the bottom part of the screen - press (Enter) again to insert the scene there
  14. Insert a Blank Printable DVD-R into Toshiba recorder
  15. Create chapter marks at specific intervals
    1. Press (Content Menu) then press (Quick Menu) and select "Chapter Function"
    2. Select "Auto Chapter create" from the menu
    3. Select the chapter interval (suggest 5 min)
  16. On EDIT's remote control do the following to dub the Playlist onto the DVD:
    1. Press (Content Menu) then press (Quick Menu) and select "High Speed Dubing"
    2. Select "Copy" from the menu to copy the playlist to DVD
  17. Press (DVD) on EDIT's front panel
  18. On EDIT's remote control do the following to finalize the DVD:
    1. Flip open the lower panel and press (Edit Menu)
    2. Select "Finalize DVD"
    3. add options settings here
    4. explain how to enter dvd name here, press save to return
    5. detail last buttons to press in order to get the dvd finalized
  19. Put the disc on the printing tray and insert it into the Epson Stylus R260 printer
  20. Go to any computer capable of running Adobe Illustrator CS4
  21. Open the file 'E:\TMM\Templates\Labels\Disc Surface\DVD Surface Template V2.2' or newer version
  22. Design Five is the template for Transfers - Change the following Text: 'Transfer #??' , 'Project Title' (Usually last name + year of transfer) , 'Type of transfer' (ex: Hi8 to DVD transfer) , 'Length'
  23. In Illustrator, click "File"->"Export" , choose file type "jpeg" , checkmark "Use Artboards" , enter a range of '5' and change save location to a place easily accessed over the network if you are not printing from the same computer, then click "Save"
  24. In the next dialogue, make sure "Quality" is set to '10', "Color Model" is set to 'RGB', "Resolution" is set to 'High', "Anti-Alias" is checked, and "Embed ICC Profile" is checked, then click "OK"
  25. If you see a dialogue that informs you that you are about to replace a file, click "Replace"
  26. Go to any computer capable of printing to the Epson Stylus R260 from Epson Print CD
  27. Open Epson Print CD
  28. Assuming you are using Ritek discs, set your inner diameter to '20' and outer diameter to '117'
  29. Drag the exported jpg from Illustrator onto the disc shape in Epson Print CD
  30. If you get a dialogue asking to save changes to 'Untitled' click "No"
  31. Click "File"->"Print" or click on the blue printer icon
  32. Ensure that the Epson Stylus R260 on Sam is selected
  33. Click "Print"
  34. When a dialogue warns that the inner print diameter is too small, click "OK"