Files

Uploading a video or file to LHF website

Overview: Need to upload a file(s) to our website (LHF) so that a customer can download it or view it.

Creating The Film File:

Render the file as small as one can for the customer to view it.  The last time I created an mp4 file using "Mainconcept AVC/AAC - Export for G1".  A file CineCap processed 1.04GB 16mm HD 2.09 minute B&W file rendered to 8.72MB.  Another CineCap processed 14.4GB Reg8 HD 33:18 minute colour file rendered to 135MB.

Two Options For Upload:

If the file is less than 1000MB (almost 1GB), then you can use the Cpanel - file manger - upload process.  Just logon using lifeti15 and follow the steps.

The other option is to use Smartftp.

Using SmartFTP:

Use SmartFTP to access our website:

address: lifetimeheritagefilms.com/

login: lifeti15

password: pwd

port: 21

Uploading (info for both methods):

Go to the following path and place your file….the last two folders are obviously the year and month that you are in….

domains/lifetimeheritagefilms.com/public_html/wp-content/uploads/YEAR/MONTH/

When sending someone a link for a file to download, here is an example…….

http://www.lifetimeheritagefilms.com/wp-content/uploads/2011/04/some_download_file.zip

The person that you send the link to will only be able to download the one file because they cannot look at any of the directory.

Name of the file should not have spaces….this may or may not cause a problem.

Related:

Check out upload speed

Copying Files to a Mac formatted drive in Ubuntu Linux

Today I figured out how to copy files to a Mac formatted drive in Ubuntu Linux for the purposes of a film transfers and why it doesn't usually work. Ubuntu Linux is capable by default to read HFS+ (most common current mac filesystem) and write to it unless journalling (a feature of the filesystem) is enabled. In this case, Ubuntu, or any other system except for OSX can only read the contents of the drive.

The default way to format a drive with DiskUtility on a Mac is to HFS+ with journalling on. Because there is no easy button for toggling it off, most people giving us drives formatted for use primarily with a Mac that have journalling enabled.

Journalling is great - it provides a way for a hard drive to very very quickly find the last known "good point" when it is unexpectedly snapped off due to a power failure or fails in other ways. It can prevent a lengthy rebuilding of the filesystem and have you up and running in seconds again. Journalling is required on any Mac boot drive. NEVER DISABLE JOURNALLING on the boot drive of any Mac.

You may need to disable journalling if you want to use Linux to copy files to external USB & FireWire drives.

Unfortunately, the only way to do this that I have found so far is on a Mac. Even on a Mac, since Leopard (OSX 10.5) the option to disable Journalling in the Disk Utility was removed. The functionality still exists in the terminal interface to diskutil though.

I have tested the following steps for disabling journalling on an external drive on Snow Leopard (OSX 10.6.4)

  • Image that we want to disable journalling on an external drive named "Lucy"
  • Open Terminal.
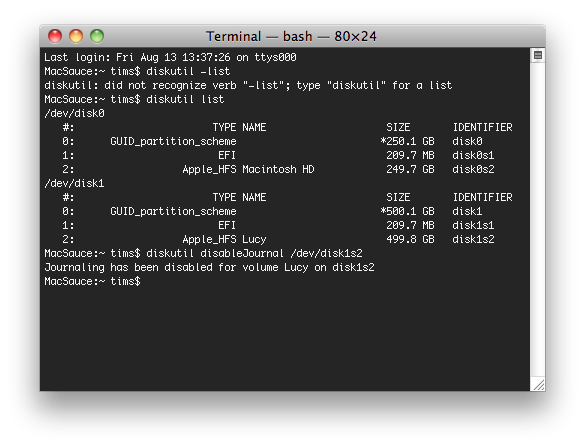
  • Type "diskutil list"
  • You will see something like this.

  • You can see that the actual volume named "Lucy" is disk1s2. The preceding volumes in the same list are partition information. Don't mess with them!
  • First you need to unmount the drive. You can do this from the finder or desktop by "Ejecting" the drive.
  • To disable journalling on Lucy, you would now type "diskutil disableJournal /dev/disk1s2". Obviously replace "disk1s2 with your own volume's identifier.
  • If it works, you will get the message "Journaling has been disabled for volume Lucy on disk1s2".
  • If it fails, you may want to try the same command as root by adding sudo to the beginning of the command. This may require you to enter root's password.

Unfortunately, we aren't done yet. Typically, we create a folder called "tmmedia" on a customer's drive to copy our files to. Doing this on while using the Mac is the most painless.

When you get to the Linux computer you will use, you will need to start terminal and navigate to the drive. Usually the drive is located at /media/Lucy/ in our situation.

  • Type "cd /media/Lucy/" to navigate there in Terminal.
  • Now we should already have created a folder called "tmmedia" on the drive.
  • We need to change permissions so that we can write to the drive.
  • The easiest way to do this is to type "sudo chmod 777 tmmedia" assuming that we have navigated here already and that the folder is called tmmedia.

Now we can finally use the Linux browser to simply drag and drop the files we want to copy.

Once the copy is complete, if we want to re enable journalling to keep our customers' files safer, simply start Disk Utility on a Mac, click on the drive, and then click on the big green enable journalling button in the middle of the graphical user interface.

Project Folder Structure

It is important that projects follow a specific structure so that anyone who has to refer to the project can find all the components. The framework is maintained by keeping files allocated to their appropriate sub-folder under the main project folder. Flat inside the main folder should rest the most current versions of the project VEG files. The following is a list of the names for the only sub-folders that should be used, followed by their descriptions:

Admin This folder will contain planning and admin documents for the project. Upon backup, this folder will be moved to E:/TMM/Projects/*Year*/(*Project Number*) *Project Name*/*.

Files Any files that are used within the project that are not RAW materials should be stored inside this folder. Files should be sorted into sub-folders named after their file type inside this folder. For example, all JPG photos should be stored inside /*Project*/Files/JPG/Photo.jpg. If the project has a vast number of a certain file type, they can be organized into sub-folders beneath the file type folder.

Labels This folder will contain the final disc surface and DVD case cover graphic art, as well as a sub-folder titled source, containing all the files used to create them.

Menus This folder contains all the media for creating DVD and Blu-ray Menus. The key file should be a .DAR (or multiple for more than one disc) flat inside the folder, which is the DVD menu design file. Other files, such as background images and audio, should be contained inside a sub-folder called source.

Music All musical compositions should be contained in this folder, under sub-folders titled according to the name of the composition. This includes such things as Cinescore or Acid projects. These sub-projects should adhere to these same project folder rules.

Old VEGs As an edit progresses on a project, we create new versions of the .VEG files to save progress along the way.  These backup .VEG files don't need to sit flat in the project folder anymore, and should be moved into this folder when there are more than three or so.

Prepared When a project is exported for DVD, it is compiled into folder on the hard drive before it is burned. This compilation is stored inside the prepared folder, underneath the date it was prepared, followed by a space and then a quick description of which disc is being prepared if applicable. For example, /*Project*/Prepared/09-01-24 Act 1/. Underneath that date folder, DVD Architect creates two sub folders, AUDIO_TS and VIDEO_TS with the DVD contents.

Pulldowns This folder is specific for Super 8 and Regular 8 film transfers, and contains mpg files that are basically extracted from the original frame-by-frame capture and stretched with a special program a specific rate to make them playback at normal speed.

RAW Even a project folder can contain RAW media in special cases. This is media that can exist here for a number of reasons.

Renders All the renders from the project go here. Video, audio, and even still frames. If there are numerous renders of a certain type and it is getting unorganized, they can be categorized into sub-folders.

Visual FX All special graphical visual effects should be contained in this folder, under sub-folders titled according to the name of the effect. This includes such things as special titling, vegas projects to include as child projects in the master Vegas file, or even 3D Godzilla renderings. These sub-projects should adhere to these same project folder rules.